
원문 : Drawing and Animation - Drawing Paths and Shapes
Drawing Paths and Shapes
사용자들은 목록에서 랜드마크(landmark)를 방문할때마다 뱃지(badge)를 받습니다. 물론, 사용자가 뱃지를 받기 위해서, 여러분이 만들어야 합니다. 이 튜토리얼에서 path와 shapes를 결합해서 뱃지를 만드는 것을 진행하며, 위치를 표현하는 또다른 모양을 겹치게 됩니다.
다른 종류의 랜드마크에 대해 여러개의 뱃지들을 만들고자 하는 경우, 중첩된 기호, 반복횟수를 바꿔보거나, 다양한 각도와 배율을 변화시키는 시도를 해보세요.
이 프로젝트를 빌드하기 위해 다음 단계를 따르거나, 완성된 프로젝트를 다운로드 받아 탐색해보세요.
Section 1. 뱃지 뷰 만들기(Create a Badge View)
뱃지를 만들기 위해서, 여러분은 SwiftUI에 있는 벡터 그리기(drawing) API를 사용해서 Badge 뷰를 만드는 것부터 시작할 것입니다.

1 단계
File > New > File을 선택하고나서, iOS 템플릿 시트에서 SwiftUI View를 선택합니다. 계속하기 위해 Next를 클릭하고나서 저장하기 필드에 Badge를 입력하고 Create를 클릭합니다.
2 단계
뱃지 모야을 정의하기 시작할때까지 Badge 텍스트를 보여주기 위해 Badge 뷰를 조정합니다.
import SwiftUI

struct Badge: View {
    var body: some View {
        Text("Badge")
    }
}

#if DEBUG
struct Badge_Previews: PreviewProvider {
    static var previews: some View {
        Badge()
    }
}
#endif
Section 2. 뱃지 배경 그리기(Draw the Badge Background)
SwiftUI에 있는 그래픽 API를 사용해서 사용자정의 뱃지 모양을 그립니다.

1 단계
HexagonParameters.swift 파일에 있는 예제 코드를 보세요.
HexagonParameters 구조체는 6각형 모양의 뱃지를 그리기 위한 세부사항을 정의합니다. 데이터는 수정하지 않는 대신에, 뱃지의 선과 곡선을 그리는데 사용할 수 있습니다.
import SwiftUI

struct HexagonParameters {
    struct Segment {
        let useWidth: (CGFloat, CGFloat, CGFloat)
        let xFactors: (CGFloat, CGFloat, CGFloat)
        let useHeight: (CGFloat, CGFloat, CGFloat)
        let yFactors: (CGFloat, CGFloat, CGFloat)
    }

    static let adjustment: CGFloat = 0.085

    static let points = [
        Segment(
            useWidth:  (1.00, 1.00, 1.00),
            xFactors:  (0.60, 0.40, 0.50),
            useHeight: (1.00, 1.00, 0.00),
            yFactors:  (0.05, 0.05, 0.00)
        ),
        Segment(
            useWidth:  (1.00, 1.00, 0.00),
            xFactors:  (0.05, 0.00, 0.00),
            useHeight: (1.00, 1.00, 1.00),
            yFactors:  (0.20 + adjustment, 0.30 + adjustment, 0.25 + adjustment)
        ),
        Segment(
            useWidth:  (1.00, 1.00, 0.00),
            xFactors:  (0.00, 0.05, 0.00),
            useHeight: (1.00, 1.00, 1.00),
            yFactors:  (0.70 - adjustment, 0.80 - adjustment, 0.75 - adjustment)
        ),
        Segment(
            useWidth:  (1.00, 1.00, 1.00),
            xFactors:  (0.40, 0.60, 0.50),
            useHeight: (1.00, 1.00, 1.00),
            yFactors:  (0.95, 0.95, 1.00)
        ),
        Segment(
            useWidth:  (1.00, 1.00, 1.00),
            xFactors:  (0.95, 1.00, 1.00),
            useHeight: (1.00, 1.00, 1.00),
            yFactors:  (0.80 - adjustment, 0.70 - adjustment, 0.75 - adjustment)
        ),
        Segment(
            useWidth:  (1.00, 1.00, 1.00),
            xFactors:  (1.00, 0.95, 1.00),
            useHeight: (1.00, 1.00, 1.00),
            yFactors:  (0.30 + adjustment, 0.20 + adjustment, 0.25 + adjustment)
        )
    ]
}
2 단계
Badge.swift에서, 뱃지에 Path 모양을 추가하고 fill() 수식어를 적용해서 도형을 뷰로 만듭니다.
path를 사용해서 선, 곡선을 결합하고, 뱃지의 6각형 배경처럼 더 복잡한 도형를 그리는 기본요소입니다.
import SwiftUI

struct Badge: View {
    var body: some View {
        Path { path in

        }
        .fill(Color.black)
    }
}

#if DEBUG
struct Badge_Previews: PreviewProvider {
    static var previews: some View {
        Badge()
    }
}
#endif
3 단계
path에 시작점을 추가하세요.
move(to:) 메소드는 상상속의 펜이나 연필이 그리기를 시작하는 것을 기다리며 그 지역위를 맴돌고 있는 것처럼, 그 모양의 범위내에서 그리기 커서를 이동합니다.
import SwiftUI

struct Badge: View {
    var body: some View {
        Path { path in
            var width: CGFloat = 100.0
            let height = width
            path.move(to: CGPoint(x: width * 0.95, y: height * 0.20))
        }
        .fill(Color.black)
    }
}

#if DEBUG
struct Badge_Previews: PreviewProvider {
    static var previews: some View {
        Badge()
    }
}
#endif
4 단계
거친 6각형 모양을 그리기 위해 모양 데이터의 각 위치를 선으로 그려줍니다.
addLine(to:) 메소드는 단일 위치를 가지고 그려줍니다. 이전 위치에서 시작하고 새로운 위치로 계속하기 위해 addLine(to:)를 연속 호출합니다.
import SwiftUI

struct Badge: View {
    var body: some View {
        Path { path in
            var width: CGFloat = 100.0
            let height = width
            path.move(to: CGPoint(x: width * 0.95, y: height * 0.20))

            HexagonParameters.points.forEach {
                path.addLine(
                    to: .init(
                        x: width * $0.useWidth.0 * $0.xFactors.0,
                        y: height * $0.useHeight.0 * $0.yFactors.0
                    )
                )
            }
        }
        .fill(Color.black)
    }
}

#if DEBUG
struct Badge_Previews: PreviewProvider {
    static var previews: some View {
        Badge()
    }
}
#endif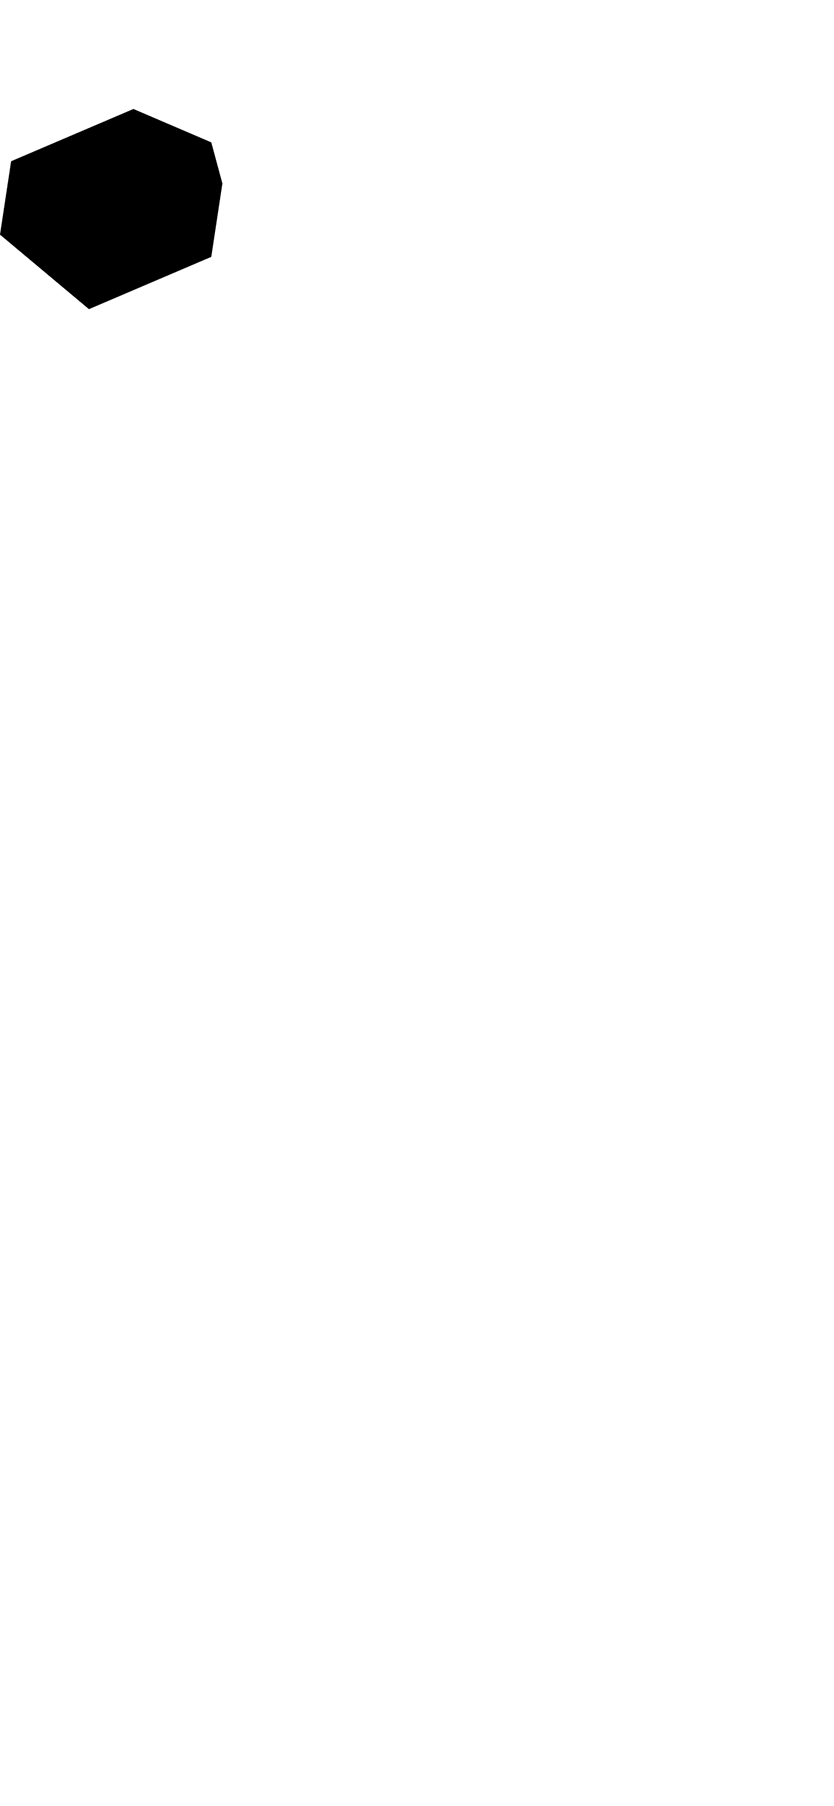
여러분의 6각형이 조금 특이하게 보여도 걱정하지 마세요. 예상했던 동작입니다. 다음 몇 단계를 통해서, 6각형의 모양이 이 섹션의 처음 보였던 뱃지 모양과 비슷해지도록 작업할 것입니다.
5 단계
뱃지의 모서리에 대한 베지어 곡선을 그리기 위해 addQuadCurve(to:control:) 메소드를 사용합니다.
import SwiftUI

struct Badge: View {
    var body: some View {
        Path { path in
            var width: CGFloat = 100.0
            let height = width
            path.move(
                to: CGPoint(
                    x: width * 0.95,
                    y: height * (0.20 + HexagonParameters.adjustment)
                )
            )

            HexagonParameters.points.forEach {
                path.addLine(
                    to: .init(
                        x: width * $0.useWidth.0 * $0.xFactors.0,
                        y: height * $0.useHeight.0 * $0.yFactors.0
                    )
                )

                path.addQuadCurve(
                    to: .init(
                        x: width * $0.useWidth.1 * $0.xFactors.1,
                        y: height * $0.useHeight.1 * $0.yFactors.1
                    ),
                    control: .init(
                        x: width * $0.useWidth.2 * $0.xFactors.2,
                        y: height * $0.useHeight.2 * $0.yFactors.2
                    )
                )
            }
        }
        .fill(Color.black)
    }
}

#if DEBUG
struct Badge_Previews: PreviewProvider {
    static var previews: some View {
        Badge()
    }
}
#endif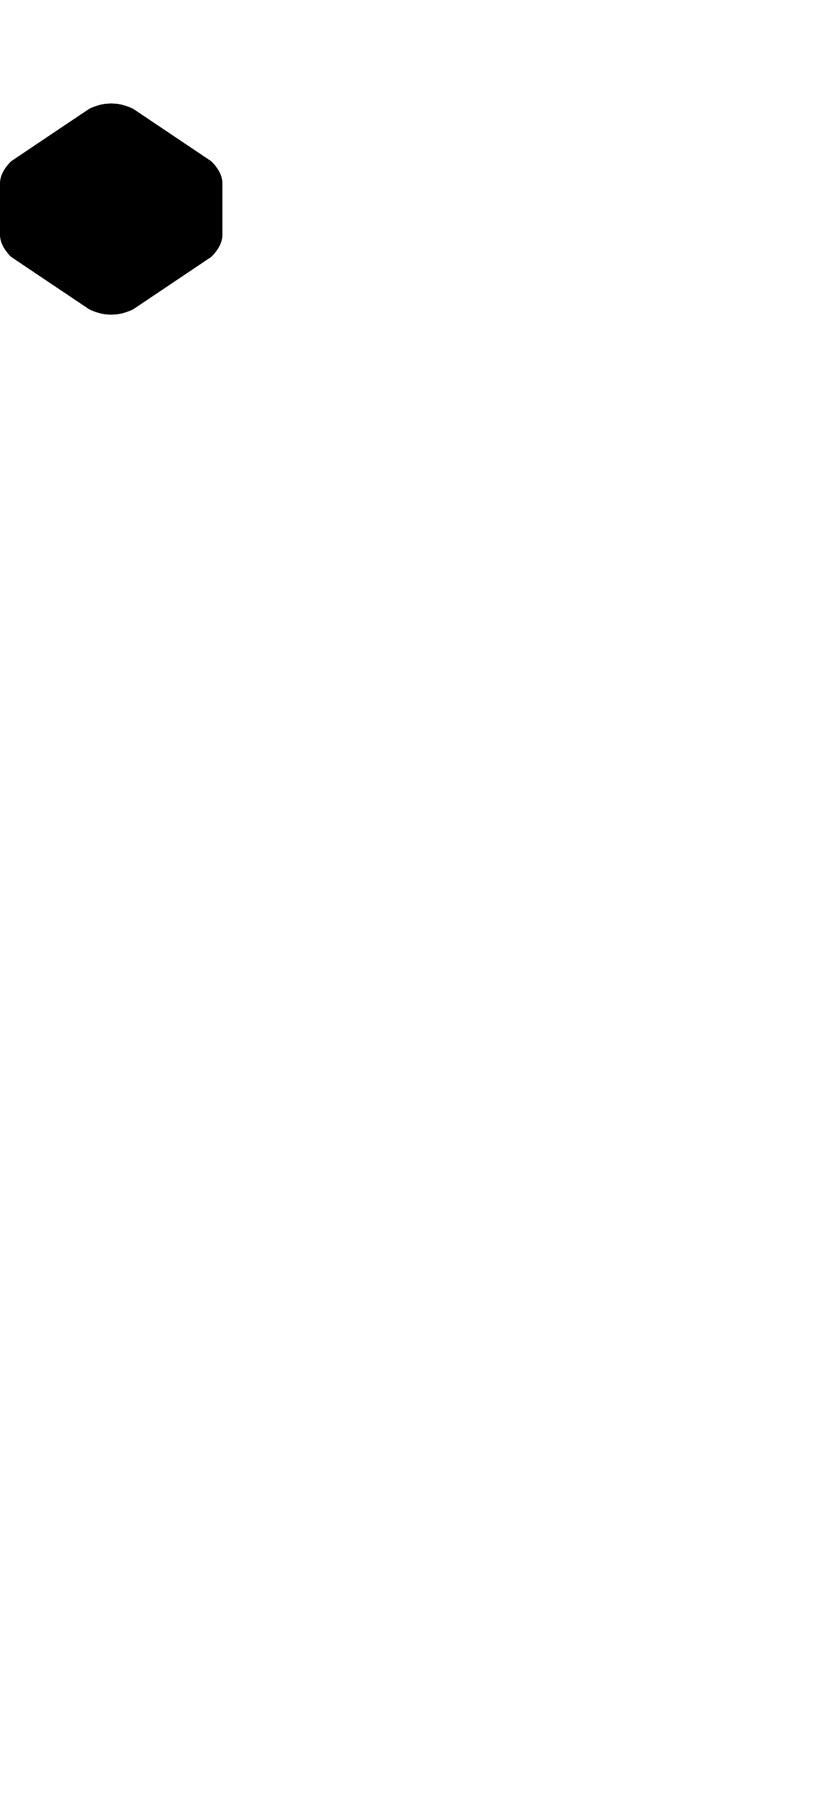
6 단계
GeometryReader에서 뱃지 path를 감쌌기에, 뱃지는 하드코딩(hard-coding)으로 정의한 크기 값(100) 대신에, 뱃지를 포함하는 뷰의 크기를 사용할 수 있습니다.
뱃지를 포함한 뷰가 정사각형이 아닐때, 기하학(geometry)의 2차원중에 가장 작은 것을 사용해서 뱃지의 종횡비(aspect ratio)를 유지합니다.
import SwiftUI

struct Badge: View {
    var body: some View {
        GeometryReader { geometry in
            Path { path in
                var width: CGFloat = min(geometry.size.width, geometry.size.height)
                let height = width
                path.move(
                    to: CGPoint(
                        x: width * 0.95,
                        y: height * (0.20 + HexagonParameters.adjustment)
                    )
                )

                HexagonParameters.points.forEach {
                    path.addLine(
                        to: .init(
                            x: width * $0.useWidth.0 * $0.xFactors.0,
                            y: height * $0.useHeight.0 * $0.yFactors.0
                        )
                    )

                    path.addQuadCurve(
                        to: .init(
                            x: width * $0.useWidth.1 * $0.xFactors.1,
                            y: height * $0.useHeight.1 * $0.yFactors.1
                        ),
                        control: .init(
                            x: width * $0.useWidth.2 * $0.xFactors.2,
                            y: height * $0.useHeight.2 * $0.yFactors.2
                        )
                    )
                }
            }
            .fill(Color.black)
        }
    }
}

#if DEBUG
struct Badge_Previews: PreviewProvider {
    static var previews: some View {
        Badge()
    }
}
#endif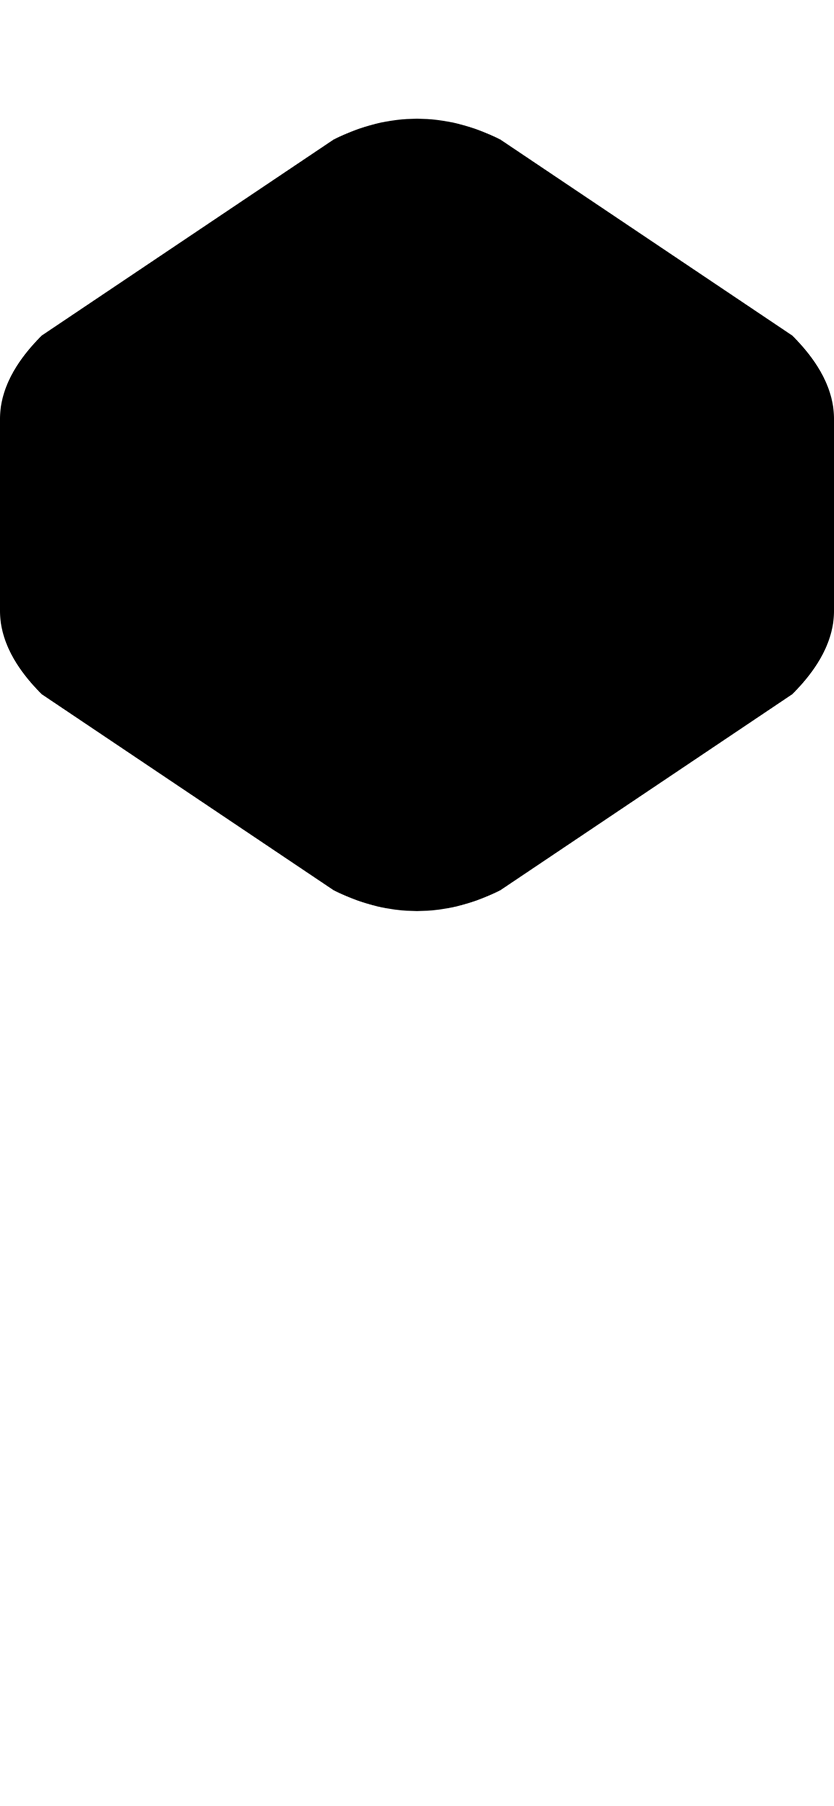
7 단계
xScale와 xOffset 조정 변수로 기하학적인 뱃지를 가운데로 위치시킵니다.
import SwiftUI

struct Badge: View {
    var body: some View {
        GeometryReader { geometry in
            Path { path in
                var width: CGFloat = min(geometry.size.width, geometry.size.height)
                let height = width
                let xScale: CGFloat = 0.832
                let xOffset = (width * (1.0 - xScale)) / 2.0
                width *= xScale
                path.move(
                    to: CGPoint(
                        x: xOffset + width * 0.95,
                        y: height * (0.20 + HexagonParameters.adjustment)
                    )
                )

                HexagonParameters.points.forEach {
                    path.addLine(
                        to: .init(
                            x: xOffset + width * $0.useWidth.0 * $0.xFactors.0,
                            y: height * $0.useHeight.0 * $0.yFactors.0
                        )
                    )

                    path.addQuadCurve(
                        to: .init(
                            x: xOffset + width * $0.useWidth.1 * $0.xFactors.1,
                            y: height * $0.useHeight.1 * $0.yFactors.1
                        ),
                        control: .init(
                            x: xOffset + width * $0.useWidth.2 * $0.xFactors.2,
                            y: height * $0.useHeight.2 * $0.yFactors.2
                        )
                    )
                }
            }
            .fill(Color.black)
        }
    }
}

#if DEBUG
struct Badge_Previews: PreviewProvider {
    static var previews: some View {
        Badge()
    }
}
#endif
8 단계
뱃지의 꽉찬(solid) 검정 배경을 설계했던것과 일치하도록 그라데이션으로 교체합니다.
import SwiftUI

struct Badge: View {
    var body: some View {
        GeometryReader { geometry in
            Path { path in
                var width: CGFloat = min(geometry.size.width, geometry.size.height)
                let height = width
                let xScale: CGFloat = 0.832
                let xOffset = (width * (1.0 - xScale)) / 2.0
                width *= xScale
                path.move(
                    to: CGPoint(
                        x: xOffset + width * 0.95,
                        y: height * (0.20 + HexagonParameters.adjustment)
                    )
                )

                HexagonParameters.points.forEach {
                    path.addLine(
                        to: .init(
                            x: xOffset + width * $0.useWidth.0 * $0.xFactors.0,
                            y: height * $0.useHeight.0 * $0.yFactors.0
                        )
                    )

                    path.addQuadCurve(
                        to: .init(
                            x: xOffset + width * $0.useWidth.1 * $0.xFactors.1,
                            y: height * $0.useHeight.1 * $0.yFactors.1
                        ),
                        control: .init(
                            x: xOffset + width * $0.useWidth.2 * $0.xFactors.2,
                            y: height * $0.useHeight.2 * $0.yFactors.2
                        )
                    )
                }
            }
            .fill(LinearGradient(
                gradient: .init(colors: [Self.gradientStart, Self.gradientEnd]),
                startPoint: .init(x: 0.5, y: 0),
                endPoint: .init(x: 0.5, y: 0.6)
            ))
        }
    }
    static let gradientStart = Color(red: 239.0 / 255, green: 120.0 / 255, blue: 221.0 / 255)
    static let gradientEnd = Color(red: 239.0 / 255, green: 172.0 / 255, blue: 120.0 / 255)
}

#if DEBUG
struct Badge_Previews: PreviewProvider {
    static var previews: some View {
        Badge()
    }
}
#endif
9 단계
그라데이션 채우기에 aspectRatio(_:contentMode:) 수식어를 적용합니다.
1:1 종횡비를 유지해서, 원래 뷰가 정사각형이 아닐지라도 뱃지를 뷰의 중앙에 오도록 위치시킵니다.
import SwiftUI

struct Badge: View {
    var body: some View {
        GeometryReader { geometry in
            Path { path in
                var width: CGFloat = min(geometry.size.width, geometry.size.height)
                let height = width
                let xScale: CGFloat = 0.832
                let xOffset = (width * (1.0 - xScale)) / 2.0
                width *= xScale
                path.move(
                    to: CGPoint(
                        x: xOffset + width * 0.95,
                        y: height * (0.20 + HexagonParameters.adjustment)
                    )
                )

                HexagonParameters.points.forEach {
                    path.addLine(
                        to: .init(
                            x: xOffset + width * $0.useWidth.0 * $0.xFactors.0,
                            y: height * $0.useHeight.0 * $0.yFactors.0
                        )
                    )

                    path.addQuadCurve(
                        to: .init(
                            x: xOffset + width * $0.useWidth.1 * $0.xFactors.1,
                            y: height * $0.useHeight.1 * $0.yFactors.1
                        ),
                        control: .init(
                            x: xOffset + width * $0.useWidth.2 * $0.xFactors.2,
                            y: height * $0.useHeight.2 * $0.yFactors.2
                        )
                    )
                }
            }
            .fill(LinearGradient(
                gradient: .init(colors: [Self.gradientStart, Self.gradientEnd]),
                startPoint: .init(x: 0.5, y: 0),
                endPoint: .init(x: 0.5, y: 0.6)
            ))
            .aspectRatio(1, contentMode: .fit)
        }
    }
    static let gradientStart = Color(red: 239.0 / 255, green: 120.0 / 255, blue: 221.0 / 255)
    static let gradientEnd = Color(red: 239.0 / 255, green: 172.0 / 255, blue: 120.0 / 255)
}

#if DEBUG
struct Badge_Previews: PreviewProvider {
    static var previews: some View {
        Badge()
    }
}
#endif
Section 3. 뱃지 기호 그리기(Draw the Badge Symbol)
랜드마크(Landmark) 뱃지는 중앙에 랜드마크(Lendmark) 앱 아이콘에 나타나는 산을 기준으로 한 사용자정의 휘장(insignia)가 있습니다.
산 기호는 두개의 도형으로 구성됩니다: 하나는 꼭대기에 있는 눈 쌓인 모자모양이고, 다른 하나는 길가의 초원을 나타냅니다. 여러분은 작은 틈으로 나눠진 두개의 삼각형 모양을 사용해서 그릴 것입니다.

1 단계
추가 뷰를 위해 Badge 뷰를 준비하는 방법처럼, Badge 뷰 본문을 BadgetBackground.swift라는 이름의 새 파일에 있는 새로운 BadgeBackground 뷰로 추출합니다.
import SwiftUI

struct BadgeBackground: View {
    var body: some View {
        GeometryReader { geometry in
            Path { path in
                var width: CGFloat = min(geometry.size.width, geometry.size.height)
                let height = width
                let xScale: CGFloat = 0.832
                let xOffset = (width * (1.0 - xScale)) / 2.0
                width *= xScale
                path.move(
                    to: CGPoint(
                        x: xOffset + width * 0.95,
                        y: height * (0.20 + HexagonParameters.adjustment)
                    )
                )

                HexagonParameters.points.forEach {
                    path.addLine(
                        to: .init(
                            x: xOffset + width * $0.useWidth.0 * $0.xFactors.0,
                            y: height * $0.useHeight.0 * $0.yFactors.0
                        )
                    )

                    path.addQuadCurve(
                        to: .init(
                            x: xOffset + width * $0.useWidth.1 * $0.xFactors.1,
                            y: height * $0.useHeight.1 * $0.yFactors.1
                        ),
                        control: .init(
                            x: xOffset + width * $0.useWidth.2 * $0.xFactors.2,
                            y: height * $0.useHeight.2 * $0.yFactors.2
                        )
                    )
                }
            }
            .fill(LinearGradient(
                gradient: .init(colors: [Self.gradientStart, Self.gradientEnd]),
                startPoint: .init(x: 0.5, y: 0),
                endPoint: .init(x: 0.5, y: 0.6)
            ))
            .aspectRatio(1, contentMode: .fit)
        }
    }
    static let gradientStart = Color(red: 239.0 / 255, green: 120.0 / 255, blue: 221.0 / 255)
    static let gradientEnd = Color(red: 239.0 / 255, green: 172.0 / 255, blue: 120.0 / 255)
}

#if DEBUG
struct BadgeBackground_Previews: PreviewProvider {
    static var previews: some View {
        BadgeBackground()
    }
}
#endif
2 단계
뱃지를 원래대로하기 위해서 Badge의 본문에 BadgeBackground를 넣습니다.
import SwiftUI

struct Badge: View {
    var body: some View {
        BadgeBackground()
    }
}

#if DEBUG
struct Badge_Previews: PreviewProvider {
    static var previews: some View {
        Badge()
    }
}
#endif
3 단계
뱃지 디자인에서 회전된 패턴이 찍혀있는 산 모양을 위해 새로운 사용자정의 뷰 BadgeSymbol을 만듭니다.
import SwiftUI

struct BadgeSymbol: View {
    var body: some View {
        Text("Badge Symbol")
    }
}

#if DEBUG
struct BadgeSymbol_Previews: PreviewProvider {
    static var previews: some View {
        BadgeSymbol()
    }
}
#endif
4 단계
path API를 사용해서 기호의 상단 위치를 그립니다.
실험(Experiment)
전체적인 모양에 어떤 영향을 미치는지 보기 위해서 간격(spacing), topWidth, topHeight 상수와 관련된 숫자 곱하기를 조정해보세요.
import SwiftUI

struct BadgeSymbol: View {
    var body: some View {
        GeometryReader { geometry in
            Path { path in
                let width = min(geometry.size.width, geometry.size.height)
                let height = width * 0.75
                let spacing = width * 0.030
                let middle = width / 2
                let topWidth = 0.226 * width
                let topHeight = 0.488 * height

                path.addLines([
                    CGPoint(x: middle, y: spacing),
                    CGPoint(x: middle - topWidth, y: topHeight - spacing),
                    CGPoint(x: middle, y: topHeight / 2 + spacing),
                    CGPoint(x: middle + topWidth, y: topHeight - spacing),
                    CGPoint(x: middle, y: spacing)
                ])
            }
        }
    }
}

#if DEBUG
struct BadgeSymbol_Previews: PreviewProvider {
    static var previews: some View {
        BadgeSymbol()
    }
}
#endif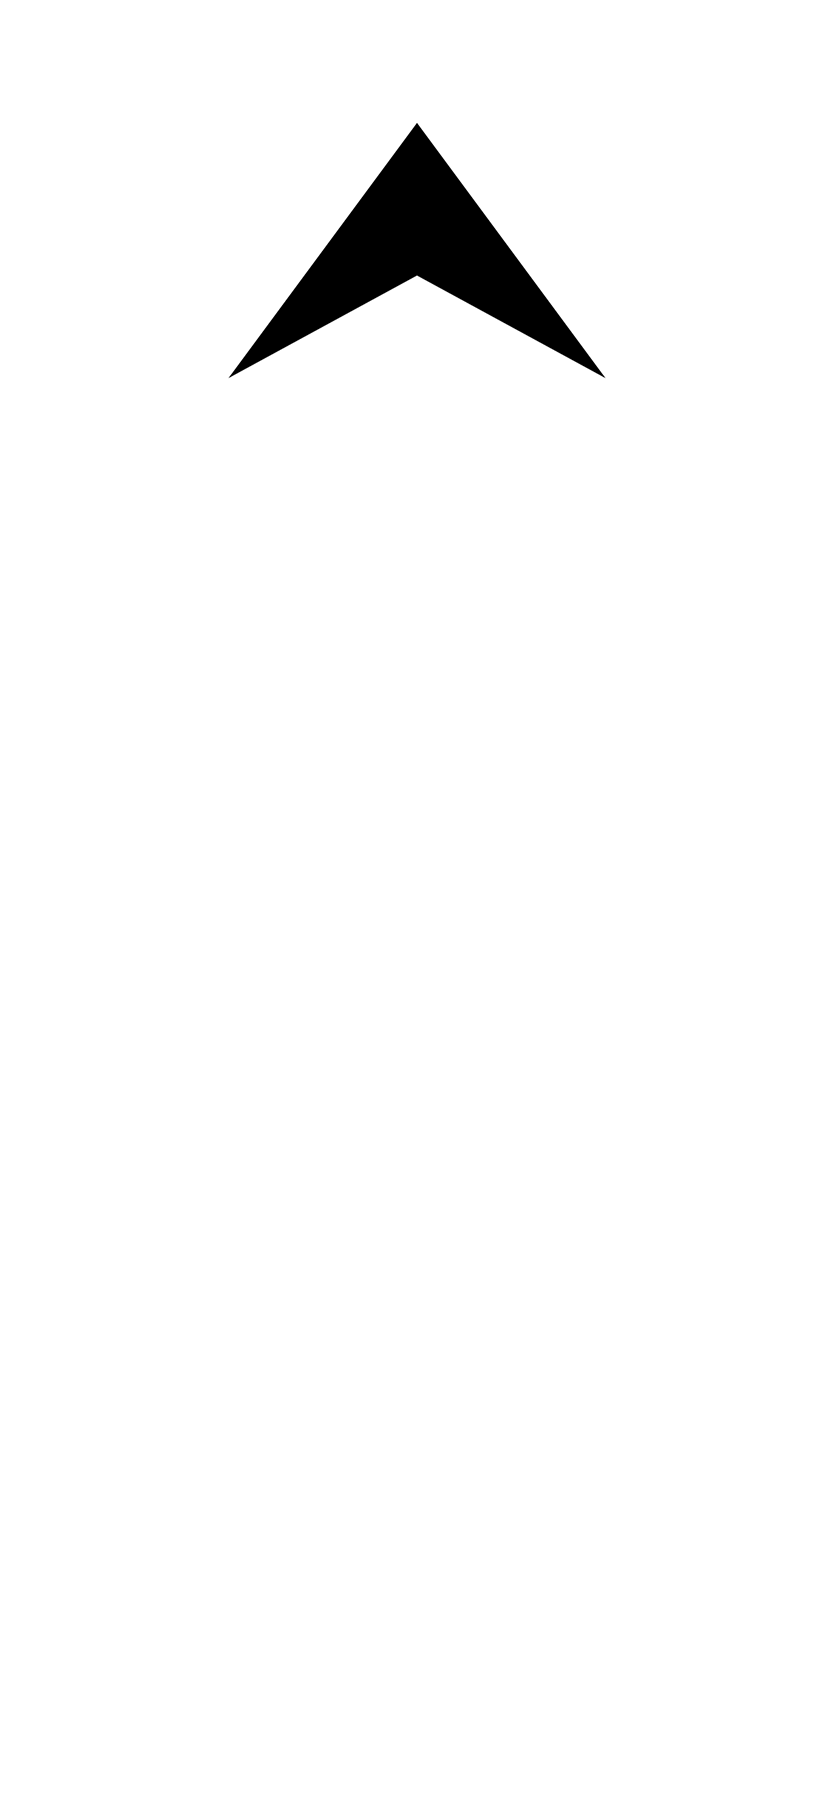
5 단계
기호의 하단부분을 그립니다.
동일한 path에 있는 여러 도형간에 간격을 주기 위해 move(to:) 수식어를 사용합니다.
import SwiftUI

struct BadgeSymbol: View {
    var body: some View {
        GeometryReader { geometry in
            Path { path in
                let width = min(geometry.size.width, geometry.size.height)
                let height = width * 0.75
                let spacing = width * 0.030
                let middle = width / 2
                let topWidth = 0.226 * width
                let topHeight = 0.488 * height

                path.addLines([
                    CGPoint(x: middle, y: spacing),
                    CGPoint(x: middle - topWidth, y: topHeight - spacing),
                    CGPoint(x: middle, y: topHeight / 2 + spacing),
                    CGPoint(x: middle + topWidth, y: topHeight - spacing),
                    CGPoint(x: middle, y: spacing)
                ])

                path.move(to: CGPoint(x: middle, y: topHeight / 2 + spacing * 3))
                path.addLines([
                    CGPoint(x: middle - topWidth, y: topHeight + spacing),
                    CGPoint(x: spacing, y: height - spacing),
                    CGPoint(x: width - spacing, y: height - spacing),
                    CGPoint(x: middle + topWidth, y: topHeight + spacing),
                    CGPoint(x: middle, y: topHeight / 2 + spacing * 3)
                ])
            }
        }
    }
}

#if DEBUG
struct BadgeSymbol_Previews: PreviewProvider {
    static var previews: some View {
        BadgeSymbol()
    }
}
#endif
6 단계
설계했던 보라색으로 기호를 채워줍니다.
import SwiftUI

struct BadgeSymbol: View {
    static let symbolColor = Color(red: 79.0 / 255, green: 79.0 / 255, blue: 191.0 / 255)

    var body: some View {
        GeometryReader { geometry in
            Path { path in
                let width = min(geometry.size.width, geometry.size.height)
                let height = width * 0.75
                let spacing = width * 0.030
                let middle = width / 2
                let topWidth = 0.226 * width
                let topHeight = 0.488 * height

                path.addLines([
                    CGPoint(x: middle, y: spacing),
                    CGPoint(x: middle - topWidth, y: topHeight - spacing),
                    CGPoint(x: middle, y: topHeight / 2 + spacing),
                    CGPoint(x: middle + topWidth, y: topHeight - spacing),
                    CGPoint(x: middle, y: spacing)
                ])

                path.move(to: CGPoint(x: middle, y: topHeight / 2 + spacing * 3))
                path.addLines([
                    CGPoint(x: middle - topWidth, y: topHeight + spacing),
                    CGPoint(x: spacing, y: height - spacing),
                    CGPoint(x: width - spacing, y: height - spacing),
                    CGPoint(x: middle + topWidth, y: topHeight + spacing),
                    CGPoint(x: middle, y: topHeight / 2 + spacing * 3)
                ])
            }
            .fill(Self.symbolColor)
        }
    }
}

#if DEBUG
struct BadgeSymbol_Previews: PreviewProvider {
    static var previews: some View {
        BadgeSymbol()
    }
}
#endif
Section 4. 뱃지 전경과 배경 결합하기(Combine the Badge Foreground and Background)
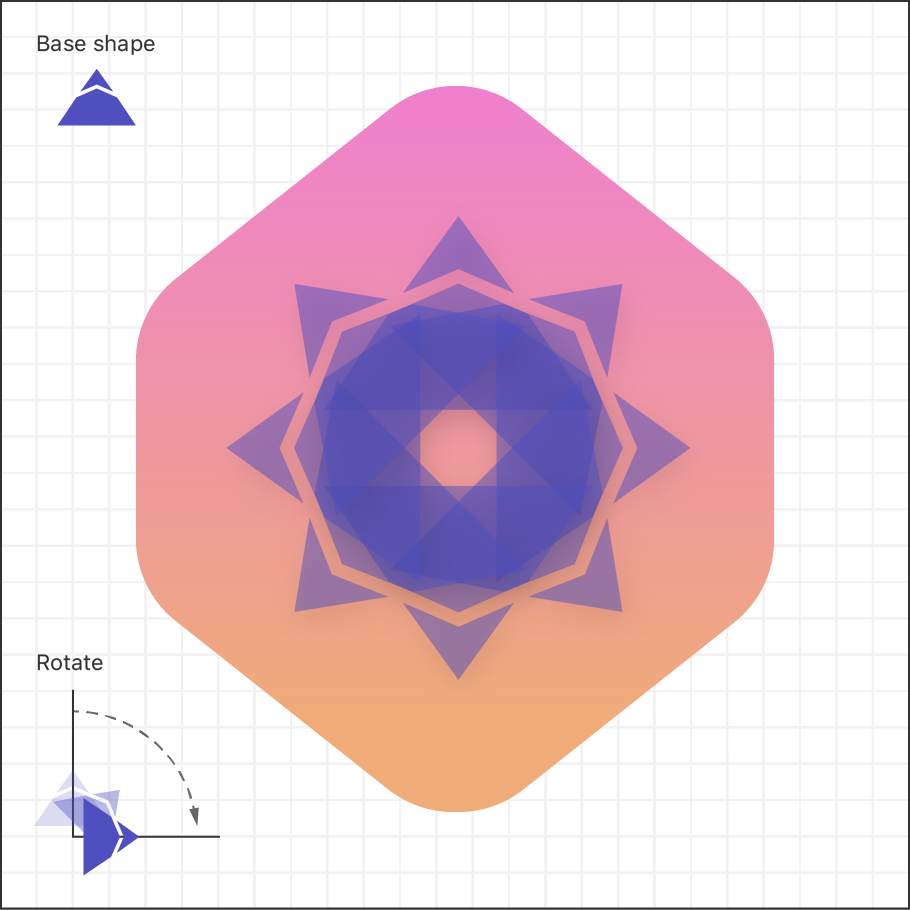
뱃지 설계는 뱃지 배경 위에 산 모양을 회전시켜 여러번 반복하는 것을 요구합니다.
회전을 위한 새로운 타입을 정의하고 ForEach 를 활용해서 여러개의 산 모양 복사본들을 동일하게 조정합니다.
1 단계
회전된 기호 컨셉을 캡슐화하기 위한 RotatedBadgeSymbol 뷰를 만듭니다.
실험(Experiment)
회전 효과를 테스트 하기 위해서 미리보기에서 각도를 조정합니다.
import SwiftUI

struct RotatedBadgeSymbol: View {
    let angle: Angle

    var body: some View {
        BadgeSymbol()
            .padding(-60)
            .rotationEffect(angle, anchor: .bottom)
    }
}

struct RotatedBadgeSymbol_Previews: PreviewProvider {
    static var previews: some View {
        RotatedBadgeSymbol(angle: .init(degrees: 5))
    }
}
2 단계
Badge.swift에서, ZStack를 사용해서 뱃지의 기호를 뱃지 배경위에 올려놓습니다.
import SwiftUI

struct Badge: View {
    var badgeSymbols: some View {
        RotatedBadgeSymbol(angle: .init(degrees: 0))
            .opacity(0.5)
    }

    var body: some View {
        ZStack {
            BadgeBackground()

            self.badgeSymbols
        }
    }
}

#if DEBUG
struct Badge_Previews: PreviewProvider {
    static var previews: some View {
        Badge()
    }
}
#endif
보이는 것처럼, 뱃지 기호는 의도했던 설계와 배경의 상대적인 크기보다 더 큽니다.
import SwiftUI

struct Badge: View {
    var badgeSymbols: some View {
        RotatedBadgeSymbol(angle: .init(degrees: 0))
            .opacity(0.5)
    }

    var body: some View {
        ZStack {
            BadgeBackground()

            GeometryReader { geometry in
                self.badgeSymbols
                    .scaleEffect(1.0 / 4.0, anchor: .top)
                    .position(x: geometry.size.width / 2.0, y: (3.0 / 4.0) * geometry.size.height)
            }
        }
    }
}

#if DEBUG
struct Badge_Previews: PreviewProvider {
    static var previews: some View {
        Badge()
    }
}
#endif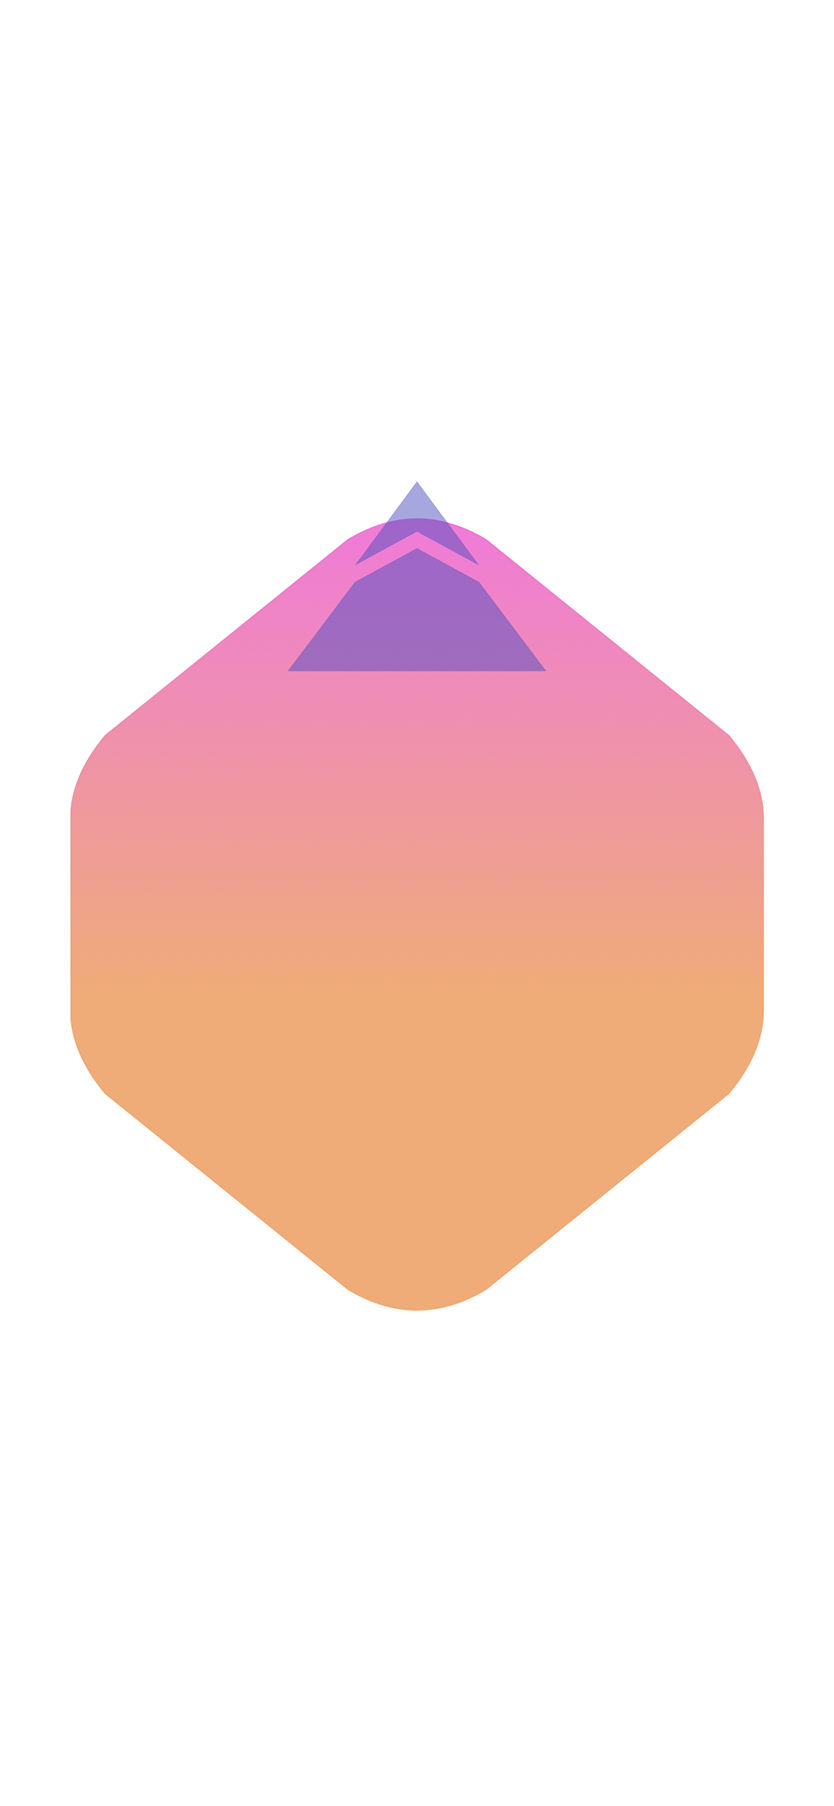
4 단계
뱃지 기호의 복사본을 회전하고 보여주기 위해서 뷰에 ForEach를 추가합니다.
완전한, 360도 회전은 8개의 요소들로 나눠져서 산 기호를 반복함으로써 태양과 같은 패턴을 만들어 냅니다.
import SwiftUI

struct Badge: View {
    static let rotationCount = 8

    var badgeSymbols: some View {
        ForEach(0..<Badge.rotationCount) { i in
            RotatedBadgeSymbol(
                angle: .degrees(Double(i) / Double(Badge.rotationCount)) * 360.0
            )
        }
        .opacity(0.5)
    }

    var body: some View {
        ZStack {
            BadgeBackground()

            GeometryReader { geometry in
                self.badgeSymbols
                    .scaleEffect(1.0 / 4.0, anchor: .top)
                    .position(x: geometry.size.width / 2.0, y: (3.0 / 4.0) * geometry.size.height)
            }
        }
        .scaledToFit()
    }
}

#if DEBUG
struct Badge_Previews: PreviewProvider {
    static var previews: some View {
        Badge()
    }
}
#endif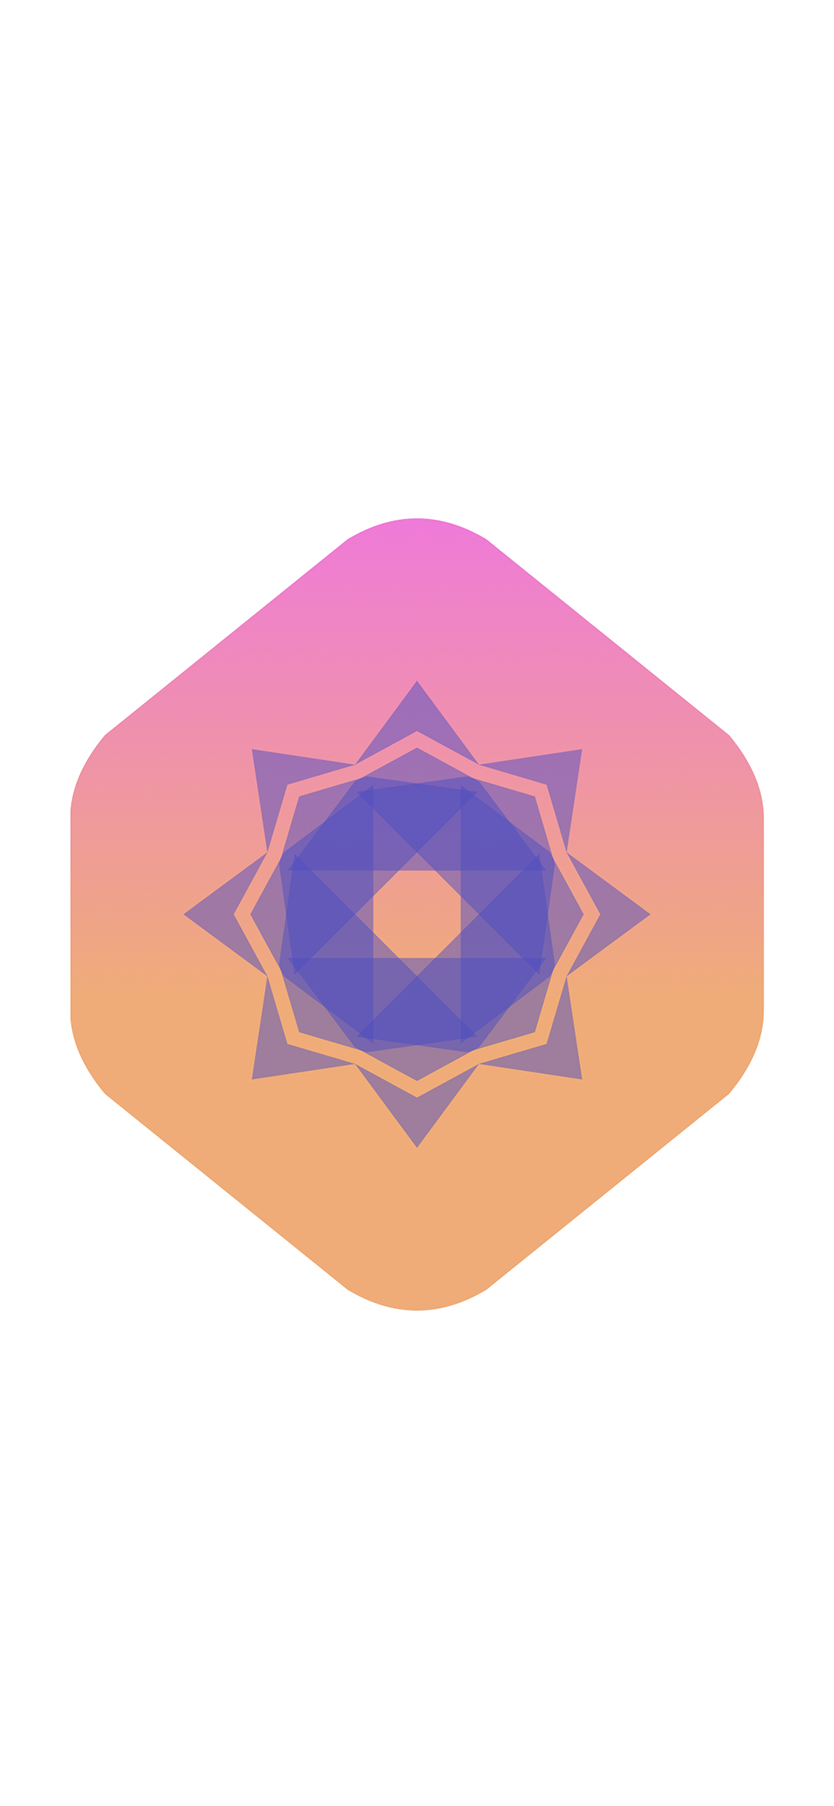
이해하는지 확인하기(Check Your Understanding)
퀴즈 1. GeometryReader의 목적은 무엇인가요?
- 부모 뷰를 화면에 뷰를 배치하는데 사용하는 그리드(grid)로 분할하기 위해서 GeometryReader을 사용합니다.
- 앱에서 뷰를 재사용하거나, 다른 크기로 보여주고자 할때 하드 코딩한 숫자 대신에 동적으로 그리고(draw), 배치하고(position), 크기를 조정하기 위해 GeometryReader를 사용합니다.
- Circle와 같은 앱의 뷰 계층구조에서 도형 뷰의 타입과 위치를 자동으로 식별하기 위해 GeometryReader를 사용합니다.
[정답 : 2]
GeometryReader는 부모 뷰와 기기 크기에 대한 위치 정보를 동적으로 제공하며, 크기가 변경될때마다 업데이트합니다; 예를 들어 사용자가 iPhone을 회전할때입니다.
퀴즈 2. 다음에 오는 코드에서 뷰를 어떻게 배치하나요?
ZStack {
   Circle().fill(Color.green)
   Circle().fill(Color.yellow).scaleEffect(0.8)
   Circle().fill(Color.orange).scaleEffect(0.6)
   Circle().fill(Color.red).scaleEffect(0.4)
}
1.

2.

3.

[정답 : 1]
ZStack은 각각 뷰 위에 겹쳐집니다.
퀴즈 3. 다음에 오는 그리기 코드는 어떤 도형을 만드나요?
Path { path in
   path.move(to: CGPoint(x: 20, y: 0))
   path.addLine(to: CGPoint(x: 20, y: 200))
   path.addLine(to: CGPoint(x: 220, y: 200))
   path.addLine(to: CGPoint(x: 220, y: 0))
}
.fill(
   LinearGradient(
       gradient: .init(colors: [Color.green, Color.blue]),
       startPoint: .init(x: 0.5, y: 0),
       endPoint: .init(x: 0.5, y: 0.5)
   )
)
1.
2.

3.

[정답 : 3]
path 작성기(builder)는 시작점에 동일한 길이의 직선을 자동으로 추가하며, 4면의 정사각형을 만듭니다.
'SwiftUI > Tutorials' 카테고리의 다른 글
| Interfacing with UIKit (0) | 2019.08.13 |
|---|---|
| Working with UI Controls (0) | 2019.08.13 |
| Composing Complex Interfaces (0) | 2019.08.13 |
| Animating Views and Transitions (0) | 2019.08.13 |
| Handling User Input (0) | 2019.08.13 |
| Building Lists and Navigation (0) | 2019.07.23 |
| Creating and Combining Views (0) | 2019.07.23 |