
원문 : App Design and Layout - Working with UI Controls
Working with UI Controls
Landmarks 앱에서, 사용자는 그들의 개성을 표현하기 위해 프로필을 만들 수 있습니다. 사용자들에게 그들의 프로필을 변경 할 수 있도록 하기 위해, 여러분은 편집 모드를 추가하고 설정화면을 설계 할 것입니다.
여러분은 데이터 입력에 대해 여러가지 공통 사용자 인터페이스 컨트롤을 사용하고, 사용자가 변경사항을 저장할 때마다 Landmarks 모델 타입을 업데이트 할 것입니다.
이 프로젝트를 빌드하기 위해 다음 단계를 따르거나, 완성된 프로젝트를 다운로드 받아 탐색해보세요.
Section 1. 사용자 프로필 표시하기(Display a User Profile)
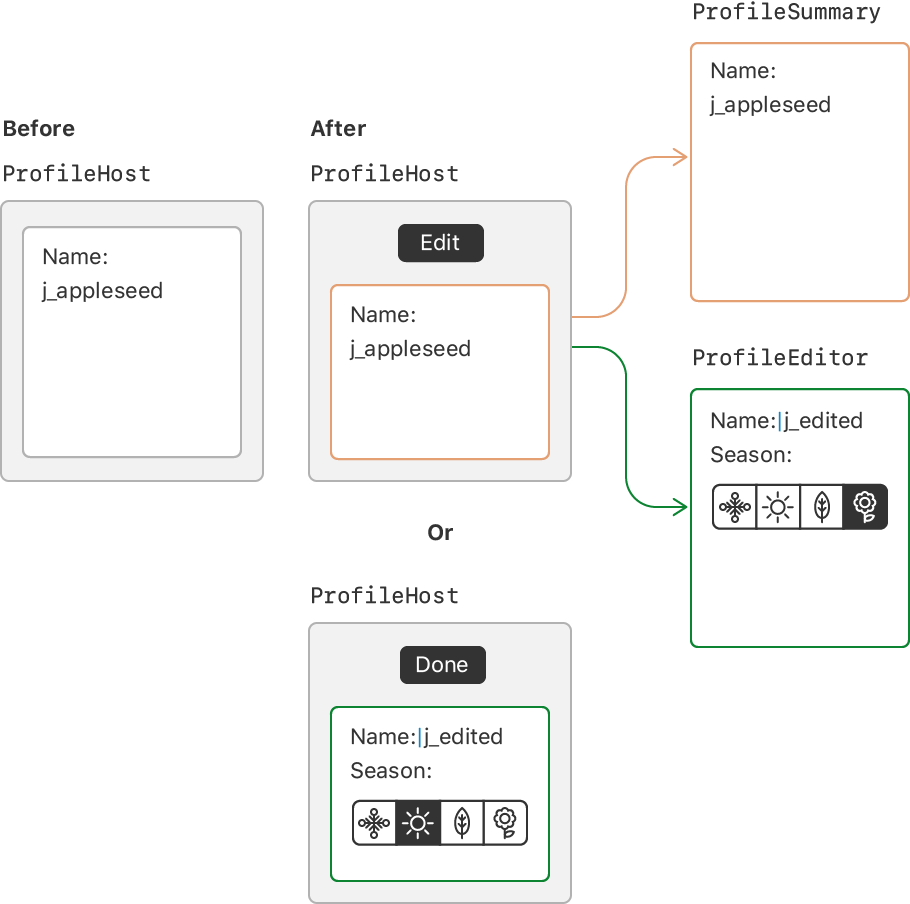
Landmarks 앱의 일부 상세 구성 정보와 기본 설정을 로컬로 저장합니다. 사용자가 상세정보를 편집하기 전에, 편집하는 컨트롤이 없는 요약 뷰가 표시됩니다.
1 단계
시작하기 위해서, Landmark 그룹 아래에 Profile 이라는 새로운 그룹을 만들고나서, 그 그룹에 ProfileHost라는 이름의 뷰를 추가합니다.
ProfileHost 뷰는 프로필 정보의 정적인 요약 뷰와 편집모드 둘 다 가지고 있습니다.
import SwiftUI

struct ProfileHost: View {
    @State var profile = Profile.default
    var body: some View {
        Text("Profile for: \(profile.username)")
    }
}

#if DEBUG
struct ProfileHost_Previews: PreviewProvider {
    static var previews: some View {
        ProfileHost()
    }
}
#endif
2 단계
Home.swift에 있는 정적인 Text를 이전 단계에서 만들었던 ProfileHost로 교체합니다.
이제 홈 화면에서 프로필 버튼은 사용자 프로펄을 모달로 표시합니다.
import SwiftUI

struct CategoryHome: View {
    var categories: [String: [Landmark]] {
        .init(
            grouping: landmarkData,
            by: { $0.category.rawValue }
        )
    }

    var featured: [Landmark] {
        landmarkData.filter { $0.isFeatured }
    }

    var body: some View {
        NavigationView {
            List {
                FeaturedLandmarks(landmarks: featured)
                    .scaledToFill()
                    .frame(height: 200)
                    .clipped()
                    .listRowInsets(EdgeInsets())

                ForEach(categories.keys.sorted().identified(by: \.self)) { key in
                    CategoryRow(categoryName: key, items: self.categories[key]!)
                }
                .listRowInsets(EdgeInsets())

                NavigationButton(destination: LandmarkList()) {
                    Text("See All")
                }
            }
            .navigationBarTitle(Text("Featured"))
            .navigationBarItems(trailing:
                PresentationButton(destination: ProfileHost()) {
                    Image(systemName: "person.crop.circle")
                        .imageScale(.large)
                        .accessibility(label: Text("User Profile"))
                        .padding()
                }
            )
        }
    }
}

struct FeaturedLandmarks: View {
    var landmarks: [Landmark]
    var body: some View {
        landmarks[0].image(forSize: 250).resizable()
    }
}

#if DEBUG
struct CategoryHome_Previews: PreviewProvider {
    static var previews: some View {
        CategoryHome()
    }
}
#endif
3 단계
ProfileSummary 라는 새로운 뷰를 만들어 Profile 인스턴스를 가져오고 몇가지 기본 사용자 정보를 표시합니다.
부모 뷰, ProfileHost때문에, 프로필 요약은 프로필에 바인딩하는 대신에 Profile 값을 가지며, 이 뷰에 대한 상태를 관리합니다.
import SwiftUI

struct ProfileSummary: View {
    var profile: Profile

    static let goalFormat: DateFormatter = {
        let formatter = DateFormatter()
        formatter.dateFormat = "MMMM d, yyyy"
        return formatter
    }()

    var body: some View {
        List {
            Text(profile.username)
                .bold()
                .font(.title)

            Text("Notifications: \(self.profile.prefersNotifications ? "On": "Off" )")

            Text("Seasonal Photos: \(self.profile.seasonalPhoto.rawValue)")

            Text("Goal Date: \(self.profile.goalDate, formatter: Self.goalFormat)")
        }
    }
}

#if DEBUG
struct ProfileSummary_Previews: PreviewProvider {
    static var previews: some View {
        ProfileSummary(profile: Profile.default)
    }
}
#endif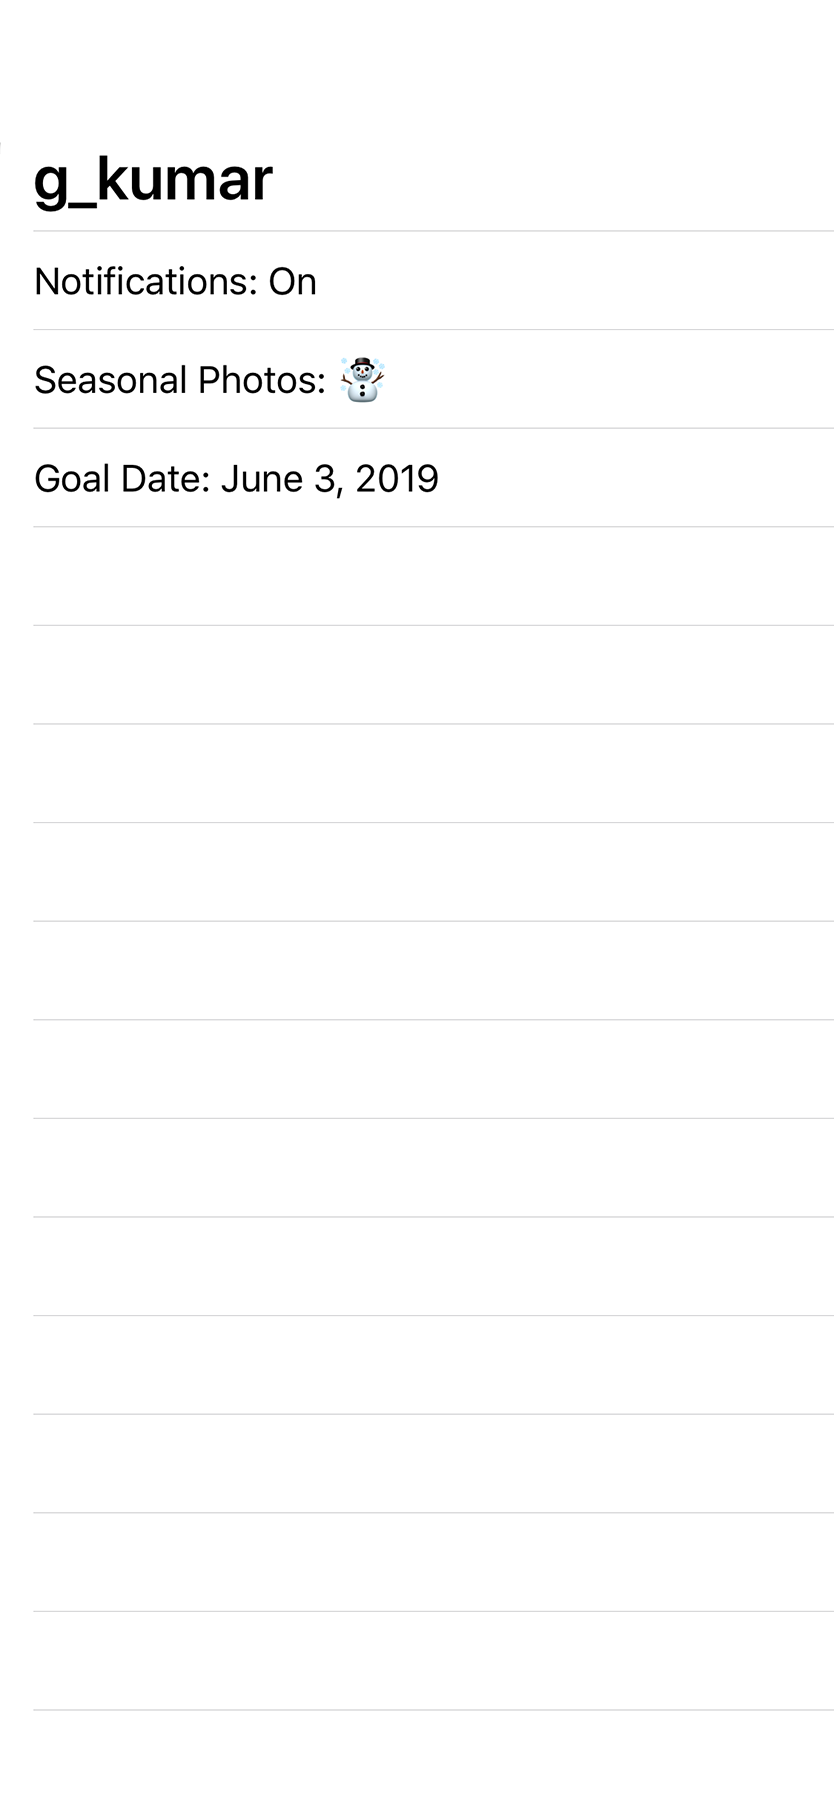
4 단계
새로운 요약뷰를 보여주기 위해 ProfileHost를 업데이트 합니다.
import SwiftUI

struct ProfileHost: View {
    @State var profile = Profile.default
    var body: some View {
        VStack(alignment: .leading, spacing: 20) {
            ProfileSummary(profile: self.profile)
        }
        .padding()
    }
}

#if DEBUG
struct ProfileHost_Previews: PreviewProvider {
    static var previews: some View {
        ProfileHost()
    }
}
#endif
5 단계
Drawing Paths and Shapes에서의 Badge와 하이킹에 대한 약간의 설명 텍스트를 함께 구성하는 HikeBadge라는 새로운 뷰를 만듭니다.
뱃지는 그래픽에 불과하므로, HikeBadge에 있는 텍스트를 accessibility(label:) 수식어를 사용함으로써 다른 사용자들에게 뱃지의 의미를 명확하게 해줍니다.
주의
frame(width:height:) 수식어의 두가지 다른 사용은 300 x 300 포인트의 설계시 치수로 확대축소되어 그리도록 뱃지를 구성합니다.
import SwiftUI

struct HikeBadge: View {
    var name: String
    var body: some View {
        VStack(alignment: .center) {
            Badge()
                .frame(width: 300, height: 300)
                .scaleEffect(1.0 / 3.0)
                .frame(width: 100, height: 100)
            Text(name)
                .font(.caption)
                .accessibility(label: Text("Badge for \(name)."))
        }
    }
}

#if DEBUG
struct HikeBadge_Previews : PreviewProvider {
    static var previews: some View {
        HikeBadge(name: "Preview Testing")
    }
}
#endif
6 단계
ProfileSummary를 업데이트해서 다양한 색상과 뱃지를 얻은 이유를 추가합니다.
import SwiftUI

struct ProfileSummary: View {
    var profile: Profile

    static let goalFormat: DateFormatter = {
        let formatter = DateFormatter()
        formatter.dateFormat = "MMMM d, yyyy"
        return formatter
    }()

    var body: some View {
        List {
            Text(profile.username)
                .bold()
                .font(.title)

            Text("Notifications: \(self.profile.prefersNotifications ? "On": "Off" )")

            Text("Seasonal Photos: \(self.profile.seasonalPhoto.rawValue)")

            Text("Goal Date: \(self.profile.goalDate, formatter: Self.goalFormat)")

            VStack(alignment: .leading) {
                Text("Completed Badges")
                    .font(.headline)
                ScrollView {
                    HStack {
                        HikeBadge(name: "First Hike")

                        HikeBadge(name: "Earth Day")
                            .hueRotation(Angle(degrees: 90))


                        HikeBadge(name: "Tenth Hike")
                            .grayscale(0.5)
                            .hueRotation(Angle(degrees: 45))
                    }
                }
                .frame(height: 140)
            }
        }
    }
}

#if DEBUG
struct ProfileSummary_Previews: PreviewProvider {
    static var previews: some View {
        ProfileSummary(profile: Profile.default)
    }
}
#endif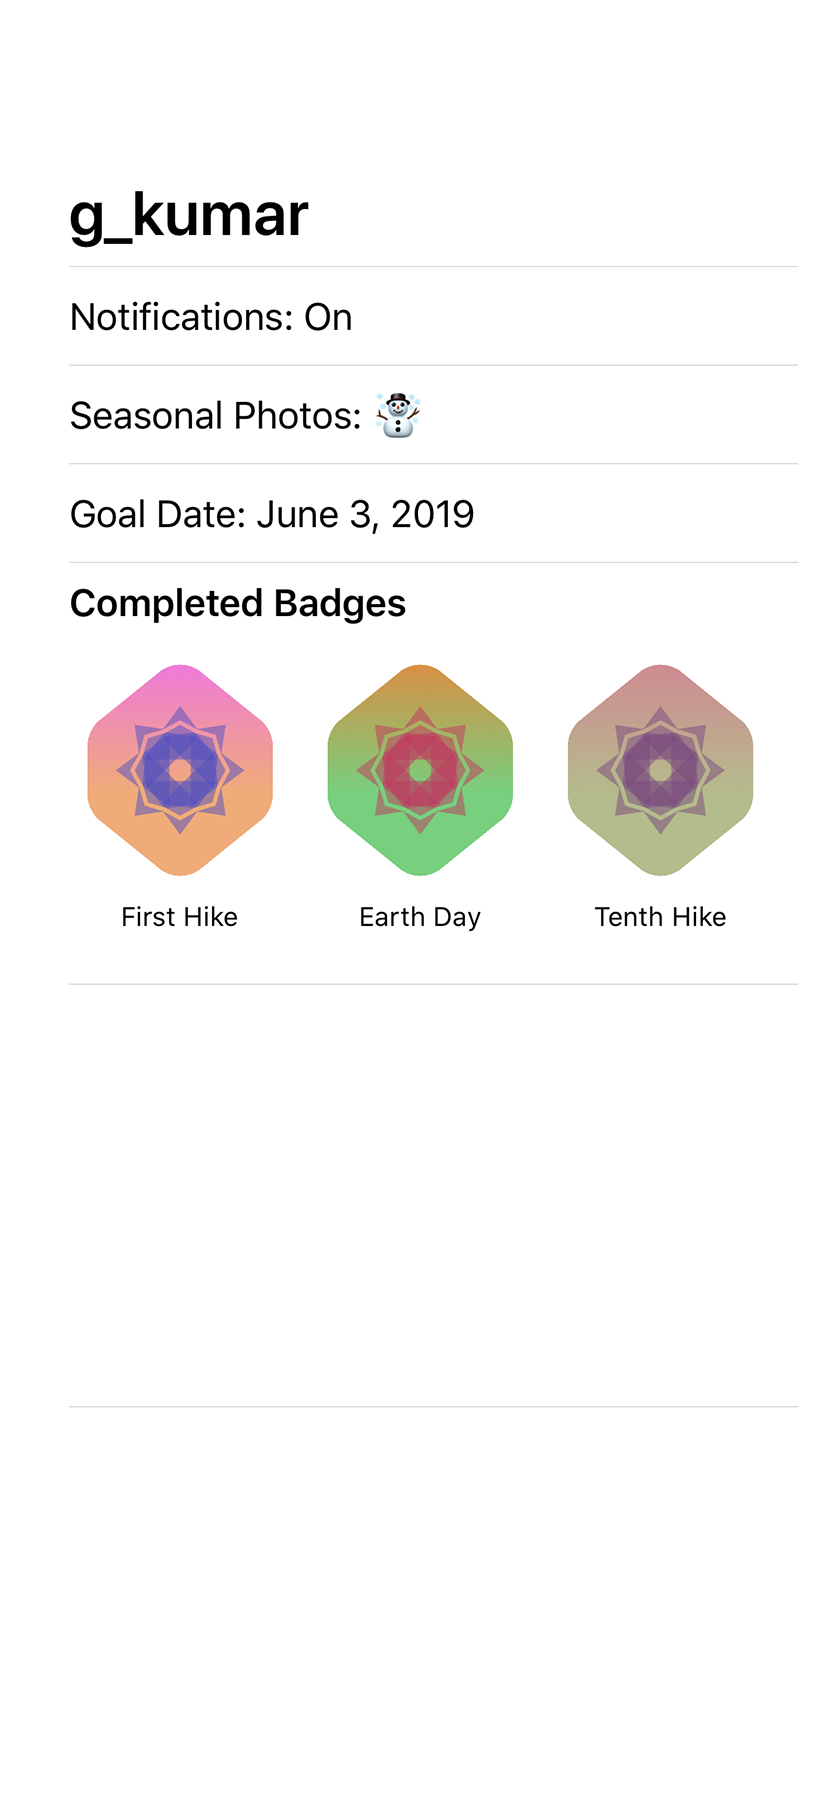
7 단계
Animating Views and Transitions에서의 HikeView를 포함해서 프로필 요약을 마무리합니다.
import SwiftUI

struct ProfileSummary: View {
    var profile: Profile

    static var goalFormat: DateFormatter {
        let formatter = DateFormatter()
        formatter.dateFormat = "MMMM d, yyyy"
        return formatter
    }

    var body: some View {
        List {
            Text(profile.username)
                .bold()
                .font(.title)

            Text("Notifications: \(self.profile.prefersNotifications ? "On": "Off" )")

            Text("Seasonal Photos: \(self.profile.seasonalPhoto.rawValue)")

            Text("Goal Date: \(self.profile.goalDate, formatter: Self.goalFormat)")

            VStack(alignment: .leading) {
                Text("Completed Badges")
                    .font(.headline)
                ScrollView {
                    HStack {
                        HikeBadge(name: "First Hike")

                        HikeBadge(name: "Earth Day")
                            .hueRotation(Angle(degrees: 90))


                        HikeBadge(name: "Tenth Hike")
                            .grayscale(0.5)
                            .hueRotation(Angle(degrees: 45))
                    }
                }
                .frame(height: 140)
            }

            VStack(alignment: .leading) {
                Text("Recent Hikes")
                    .font(.headline)

                HikeView(hike: hikeData[0])
            }
        }
    }
}

#if DEBUG
struct ProfileSummary_Previews: PreviewProvider {
    static var previews: some View {
        ProfileSummary(profile: Profile.default)
    }
}
#endif
Section 2. 편집 모드 추가하기(Add an Edit Mode)
사용자는 상세 프로필을 보여주거나 편집하는 토글이 필요합니다. 여러분은 기존 ProfileHost에 EditButton을 추가해서 편집 모드를 추가할 것이고, 그리고나서 개별 값을 편집하기 위한 컨트롤을 뷰에 만들것입니다.
1 단계
환경(environment)의 \.editMode를 벗어나는 Environment뷰 속성을 추가합니다.
현재 편집 범위에서 읽고 쓰는데에 이 속성을 사용할 수 있습니다.
import SwiftUI

struct ProfileHost: View {
    @Environment(\.editMode) var mode
    @State var profile = Profile.default
    var body: some View {
        VStack(alignment: .leading, spacing: 20) {
            ProfileSummary(profile: profile)
        }
        .padding()
    }
}

#if DEBUG
struct ProfileHost_Previews: PreviewProvider {
    static var previews: some View {
        ProfileHost()
    }
}
#endif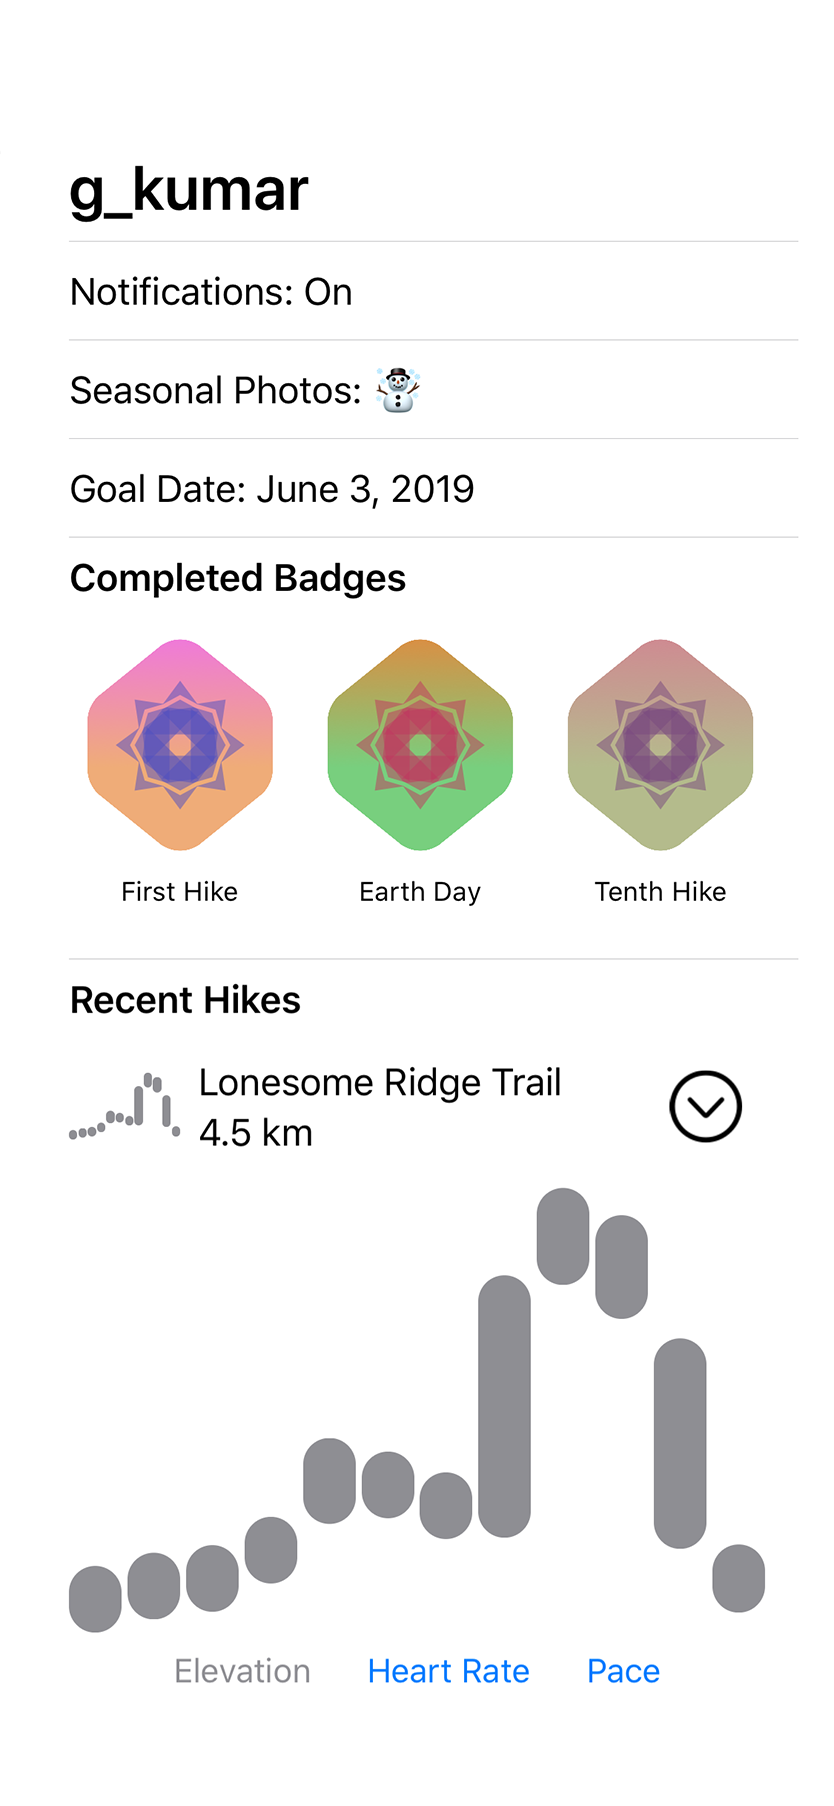
2 단계
환경의 편집모드를 켜고 끄는 Edit 버튼을 만듭니다.
import SwiftUI

struct ProfileHost: View {
    @Environment(\.editMode) var mode
    @State var profile = Profile.default
    var body: some View {
        VStack(alignment: .leading, spacing: 20) {
            HStack {
                Spacer()

                EditButton()
            }
            ProfileSummary(profile: profile)
        }
        .padding()
    }
}

#if DEBUG
struct ProfileHost_Previews: PreviewProvider {
    static var previews: some View {
        ProfileHost()
    }
}
#endif
3 단계
편집 컨트롤에 전달하기 위해 사용자의 프로필 데이터의 초안 복사본을 추가합니다.
편집을 확인하기 전에(예를들어, 사용자가 이름을 입력하는 동안에) 전역 앱 상태 업데이트를 막기 위해서 편집하는 뷰는 자체 복사본에서 동작합니다.
import SwiftUI

struct ProfileHost: View {
    @Environment(\.editMode) var mode
    @State var profile = Profile.default
    @State var draftProfile = Profile.default

    var body: some View {
        VStack(alignment: .leading, spacing: 20) {
            HStack {
                Spacer()

                EditButton()
            }
            ProfileSummary(profile: self.profile)
        }
        .padding()
    }
}

#if DEBUG
struct ProfileHost_Previews: PreviewProvider {
    static var previews: some View {
        ProfileHost()
    }
}
#endif
4 단계
정적인 프로필이나 Edit 모드에 대한 뷰들 중 하나를 보여주는 조건 뷰를 추가합니다.
주의
현재, Edit 모드는 정적인 텍스트 필드일 뿐입니다.
import SwiftUI

struct ProfileHost: View {
    @Environment(\.editMode) var mode
    @State var profile = Profile.default
    @State var draftProfile = Profile.default

    var body: some View {
        VStack(alignment: .leading, spacing: 20) {
            HStack {
                Spacer()

                EditButton()
            }
            if self.mode?.value == .inactive {
                ProfileSummary(profile: profile)
            } else {
                Text("Profile Editor")
            }
        }
        .padding()
    }
}

#if DEBUG
struct ProfileHost_Previews: PreviewProvider {
    static var previews: some View {
        ProfileHost()
    }
}
#endif
Section 3. 프로필 편집기 정의하기(Define the Profile Editor)
사용자 프로필 편집기는 주로 프로플에 있는 개별 상세 정보를 변경하는 여러개의 컨트롤로 구성되어 있습니다. 프로필에 있는 일부 항목은, 뱃지 처럼, 사용자가 편집할수 없으며, 편집기에 보이지 않습니다.
프로필 요약을 일관성있도록 하기 위해, 여러분은 편집기에서 상세 프로필에 있는 동일한 순서로 추가할 것입니다.
1 단계
ProfileEditor 이라는 새로운 뷰를 만들고 사용자의 프로필의 초안 사본에 대한 바인딩을 포함합니다.
뷰에 있는 첫번째 컨트롤은 TextField이며, 문자열 바인딩을 제어하고 업데이트 합니다 - 여기에서는, 사용자가 선택한 이름을 보여줍니다.
import SwiftUI

struct ProfileEditor: View {
    @Binding var profile: Profile

    var body: some View {
        List {
            HStack {
                Text("Username").bold()
                Divider()
                TextField($profile.username)
            }
        }
    }
}

#if DEBUG
struct ProfileEditor_Previews: PreviewProvider {
    static var previews: some View {
        ProfileEditor(profile: .constant(.default))
    }
}
#endif
2 단계
ProfileHost에 있는 조건부 컨텐츠를 업데이트해서 프로필 편집기를 포함하고 프로필 바인딩을 전달합니다.
Edit를 탭할때 프로필 편집뷰를 보여줍니다.
import SwiftUI

struct ProfileHost: View {
    @Environment(\.editMode) var mode
    @State var profile = Profile.default
    @State var draftProfile = Profile.default

    var body: some View {
        VStack(alignment: .leading, spacing: 20) {
            HStack {
                Spacer()

                EditButton()
            }
            if self.mode?.value == .inactive {
                ProfileSummary(profile: profile)
            } else {
                ProfileEditor(profile: $draftProfile)
            }
        }
        .padding()
    }
}

#if DEBUG
struct ProfileHost_Previews: PreviewProvider {
    static var previews: some View {
        ProfileHost()
    }
}
#endif
3 단계
랜드마크와 관련된 이벤트에 대한 알림을 받는 사용자의 기본 설정에 해당 토글을 추가합니다.
토글(toggles)은 켜져있거나 꺼져있는 컨트롤이므로, yes 또는 no 와 같은 Boolean 값에 적합합니다.
import SwiftUI

struct ProfileEditor: View {
    @Binding var profile: Profile

    var body: some View {
        List {
            HStack {
                Text("Username").bold()
                Divider()
                TextField($profile.username)
            }

            Toggle(isOn: $profile.prefersNotifications) {
                Text("Enable Notifications")
            }
        }
    }
}

#if DEBUG
struct ProfileEditor_Previews: PreviewProvider {
    static var previews: some View {
        ProfileEditor(profile: .constant(.default))
    }
}
#endif
4 단계
VStack에 SegmentedControl과 라벨을 배치해서 선호하는 계절을 선택할수 있는 랜드마크 사진을 만듭니다.
import SwiftUI

struct ProfileEditor: View {
    @Binding var profile: Profile

    var body: some View {
        List {
            HStack {
                Text("Username").bold()
                Divider()
                TextField($profile.username)
            }

            Toggle(isOn: $profile.prefersNotifications) {
                Text("Enable Notifications")
            }

            VStack(alignment: .leading, spacing: 20) {
                Text("Seasonal Photo").bold()

                SegmentedControl(selection: $profile.seasonalPhoto) {
                    ForEach(Profile.Season.allCases.identified(by: \.self)) { season in
                        Text(season.rawValue).tag(season)
                    }
                }
            }
            .padding(.top)
        }
    }
}

#if DEBUG
struct ProfileEditor_Previews: PreviewProvider {
    static var previews: some View {
        ProfileEditor(profile: .constant(.default))
    }
}
#endif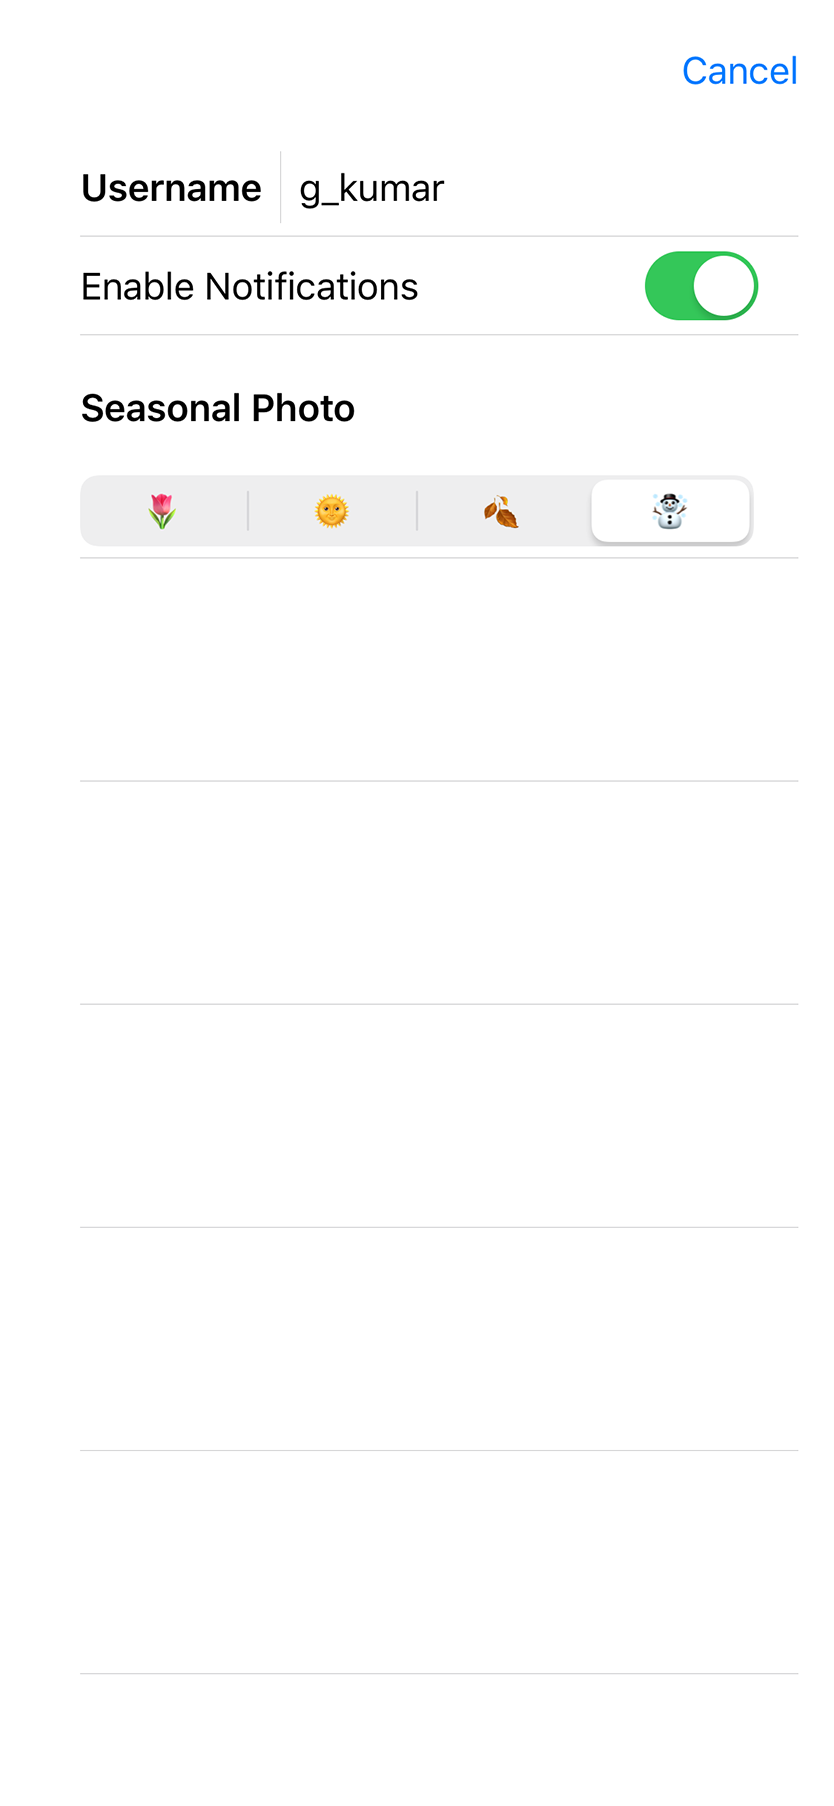
5 단계
마지막으로, 계절 선택 아래에 DatePicker를 추가해서 랜드마크 방문 목표 날짜를 수정할 수 있도록 합니다.
import SwiftUI

struct ProfileEditor: View {
    @Binding var profile: Profile

    var body: some View {
        List {
            HStack {
                Text("Username").bold()
                Divider()
                TextField($profile.username)
            }

            Toggle(isOn: $profile.prefersNotifications) {
                Text("Enable Notifications")
            }

            VStack(alignment: .leading, spacing: 20) {
                Text("Seasonal Photo").bold()

                SegmentedControl(selection: $profile.seasonalPhoto) {
                    ForEach(Profile.Season.allCases.identified(by: \.self)) { season in
                        Text(season.rawValue).tag(season)
                    }
                }
            }
            .padding(.top)

            VStack(alignment: .leading, spacing: 20) {
                Text("Goal Date").bold()
                DatePicker(
                    $profile.goalDate,
                    minimumDate: Calendar.current.date(byAdding: .year, value: -1, to: profile.goalDate),
                    maximumDate: Calendar.current.date(byAdding: .year, value: 1, to: profile.goalDate),
                    displayedComponents: .date
                )
            }
            .padding(.top)
        }
    }
}

#if DEBUG
struct ProfileEditor_Previews: PreviewProvider {
    static var previews: some View {
        ProfileEditor(profile: .constant(.default))
    }
}
#endif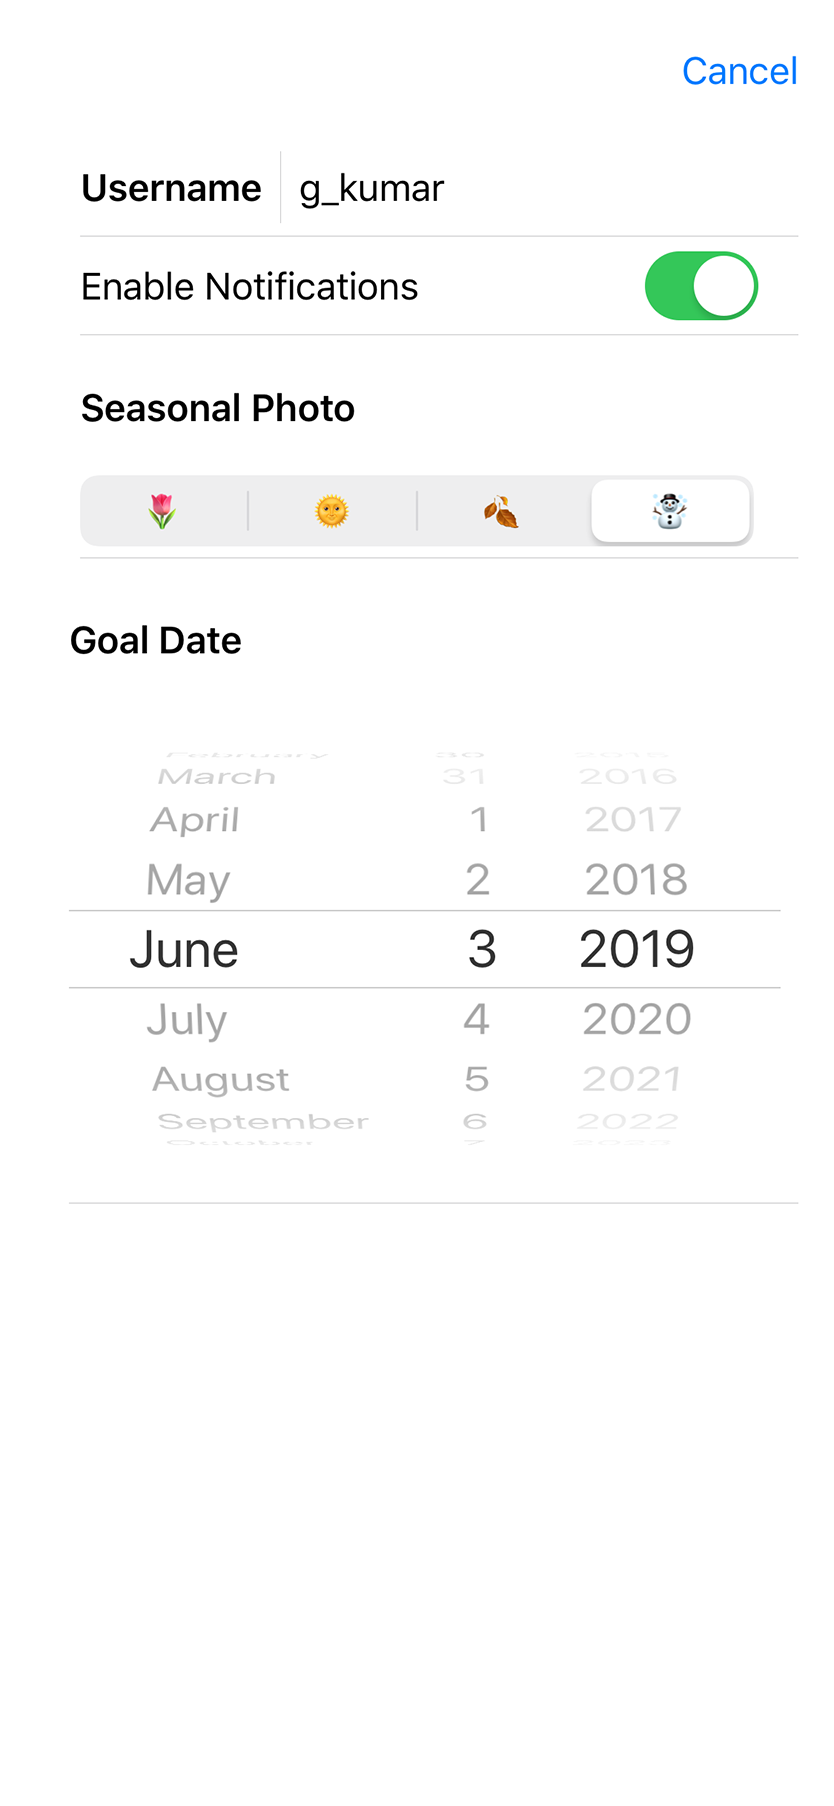
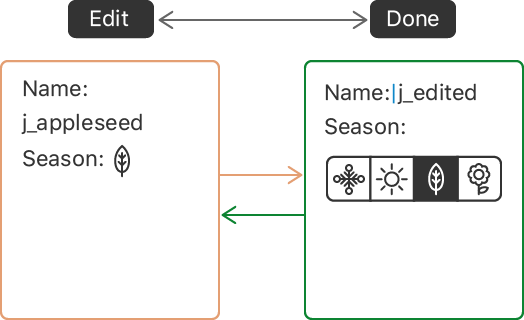
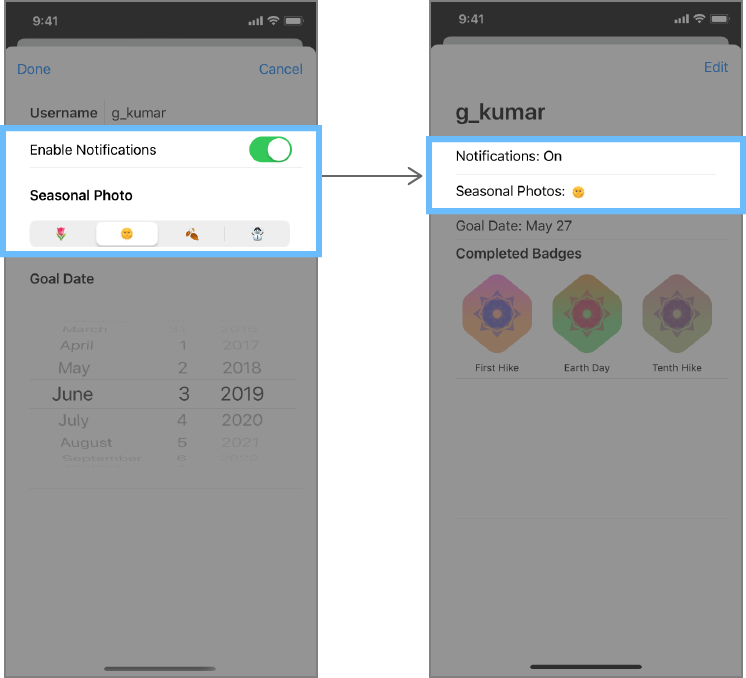
Section 4. 편집모드로 전달 지연하기(Delay Edit Propagation)
사용자가 기존 편집모드를 종료할때까지 편집이 적용되지 않도록 하기 위해서, 편집하는 동안에 초안 복사본을 사용하고, 그리고나서 사용자가 편집을 확인한 경우에만 초안 복사본을 실제 복사본에 할당합니다.

1 단계
ProfileHost에 확인 버튼을 추가합니다.
EditButton이 제공하는 Cancel 버튼과 다르게,
Done 버튼은 동작 클로져에서 실제 프로필 데이터 편집을 적용합니다.
import SwiftUI

struct ProfileHost: View {
    @Environment(\.editMode) var mode
    @State var profile = Profile.default
    @State var draftProfile = Profile.default

    var body: some View {
        VStack(alignment: .leading, spacing: 20) {
            HStack {
                if self.mode?.value == .active {
                    Button(action: {
                        self.profile = self.draftProfile
                        self.mode?.animation().value = .inactive
                    }) {
                        Text("Done")
                    }
                }

                Spacer()

                EditButton()
            }
            if self.mode?.value == .inactive {
                ProfileSummary(profile: profile)
            } else {
                ProfileEditor(profile: $draftProfile)
            }
        }
        .padding()
    }
}

#if DEBUG
struct ProfileHost_Previews: PreviewProvider {
    static var previews: some View {
        ProfileHost()
    }
}
#endif
2 단계
onDisappear(perform:) 수식어를 적용해서 사용자가 Cancel 버튼을 탭할때 사용자가 선택했던 값들을 지웁니다.
그렇지 않으면, 다음번에 편집 모드가 활성화될때 이전 값이 나타납니다.
import SwiftUI

struct ProfileHost: View {
    @Environment(\.editMode) var mode
    @State var profile = Profile.default
    @State var draftProfile = Profile.default

    var body: some View {
        VStack(alignment: .leading, spacing: 20) {
            HStack {
                if self.mode?.value == .active {
                    Button(action: {
                        self.profile = self.draftProfile
                        self.mode?.animation().value = .inactive
                    }) {
                        Text("Done")
                    }
                }

                Spacer()

                EditButton()
            }
            if self.mode?.value == .inactive {
                ProfileSummary(profile: profile)
            } else {
                ProfileEditor(profile: $draftProfile)
                    .onDisappear {
                        self.draftProfile = self.profile
                    }
            }
        }
        .padding()
    }
}

#if DEBUG
struct ProfileHost_Previews: PreviewProvider {
    static var previews: some View {
        ProfileHost()
    }
}
#endif
이해하는지 확인하기(Check Your Understanding)
퀴즈 1. 편집 상태가 변경될때 뷰를 어떻게 업데이트 하나요? 예를들어, 사용자가 프로필 편집에서 Done을 탭할때
1.
struct EditableNameView: View {
   @State var isEditing = false
   @State var name = ""
   var body: some View {
      TextField($name)
         .disabled(!isEditing)
   }
}
2.
struct EditableNameView: View {
   @Environment(\.editMode) var mode
   @State var name = ""
   var body: some View {
      TextField($name)
         .disabled(mode?.value == .inactive)
   }
}
3.
 struct EditableNameView: View {
   @State var name = ""
   var body: some View {
      TextField($name)
         .onEditingChanged { isEditing in
            $0.disabled = !isEditing
         }
   }
}
[정답 : 2]
그 코드는 환경에 저장된 편집 모드를 확인합니다. 환경에서 편집모드는 저장하면 사용자가 편집 모드를 들어가고 나갈때 여러 뷰들을 간단히 업데이트 할 수 있습니다.
퀴즈 2. 언제 accessibility(label:) 수식어를 사용해서 손쉬운 사용(accessibility) 라벨을 추가하나요?
- 항상 앱의 모든 뷰에 손쉬운 사용(accessibility) 라벨을 추가합니다.
- 많은 사용자들에게 사용자 인터페이스 요소의 의미를 명확히 하고자 할때 마다 손쉬운 사용(accessibility) 라벨을 추가합니다.
- 뷰에 태그 수식어를 추가하지 않은 경우에만 accessibility(label:) 수식어를 사용합니다.
[정답 : 2]
VoiceOver를 켠 상태에서 앱을 테스트하고나서 필요에 따라 앱의 뷰에 손쉬운 사용(accessibility) 라벨을 추가합니다.
퀴즈 3. 모달(modal)과 모달이 아닌(non-modal) 뷰 프리젠테이션 간의 차이점은 무엇인가요?
- 뷰를 모달로 표현할때, 원본 뷰가 대상 뷰의 편집모드를 설정합니다.
- 뷰를 모달이 아닌 것으로 표현할때, 대상 뷰는 원본 뷰를 포함하고 현재 네비게이션 스택을 교체합니다.
- 뷰를 모달로 표현할때, 대상 뷰는 원본 뷰를 포함하고 현재 네비게이션 스택을 교체합니다.
[정답 : 3]
앱의 정상적인 흐름에서 벗어나고자 할때 뷰를 모달로 표현합니다.
'SwiftUI > Tutorials' 카테고리의 다른 글
| Interfacing with UIKit (0) | 2019.08.13 |
|---|---|
| Composing Complex Interfaces (0) | 2019.08.13 |
| Animating Views and Transitions (0) | 2019.08.13 |
| Drawing Paths and Shapes (0) | 2019.08.13 |
| Handling User Input (0) | 2019.08.13 |
| Building Lists and Navigation (0) | 2019.07.23 |
| Creating and Combining Views (0) | 2019.07.23 |